Ultimate Guide to Recover Lost or Deleted Data on Mac (2026)
-
Written By Pallavi
-
Approved By Kuljeet Singh

-
 Updated on 5 Jan, 2026
 -
 Min Reading 17 Min


You buy a Mac for its reliability and smooth experience and yet... no machine is infallible. One moment your project files are there and the next, they’re gone, leaving you to confront an unexpected digital emergency. From file system corruption to human errors, your data can disappear faster than you can say “Time Machine.” So, in this pillar guide, we’ll be unpacking all the possible causes of Mac data loss, discuss some practical prevention strategies and then show step-by-step recovery techniques that actually work.
Data shows that Mac users tend to come across these data loss scenarios about 30% more often than Windows users. This data gives a false sense of security to them as many Mac owners just assume that features like Time Machine and iCloud will automatically protect their files. Put in simple terms, data loss is not at all rare on Mac. Whether it is there due to human error, hardware failure or software glitches, losing those important files can happen just to anyone.
Given how critical your data is (photos, work documents, personal projects, etc.), every Mac user should be knowing the risks and recovery options beforehand. Apple’s APFS file system offers you snapshots, full-disk encryption, crash protection and more, which can help you guard that system against data corruption. But even APFS can’t actually save those files if, let’s say, a drive physically fails or you overwrite your own data by mistake. For example APFS has built-in snapshots that allow you to “go back in time” to a previous state but those snapshots work only if you configured Time Machine backups in the past.
The key takeaway here is that any Mac system can suffer data loss and actually no one is completely immune even when it is Apple’s own secure ecosystem.
Common Causes of Data Loss on Mac
Before diving into recovery methods, let’s just recap the typical causes for file loss issues so that you can understand why data vanishes and how you can actually avoid it. On a Mac system per se, data loss usually stems from one of the following:
Logical Data Loss Scenarios
- Human Error (Accidental Deletion or Formatting): By far the most common reason is simply just deleting those files by mistake, emptying the Trash too soon or may be accidentally formatting a drive/volume. In fact, a survey found deletion actually triggers ~34% of all of those data loss incidents. It’s easy to do… hitting delete button on the wrong folder, reinitializing a disk without realizing or even dragging a file into Trash and then emptying without checking. The more files you handle in your routine, the greater is the risk and more difficult it is to recover accidentally deleted files and folders on Mac.
- File System Corruption: The Mac uses APFS (or older HFS+). Power failures, crashes, or bugs can corrupt the file system structure. This might show up as an inability to mount the volume or errors like “Invalid Node Structure” or “fsroot tree is invalid” Even though APFS is designed with snapshot and crash protection features, these issues can cause corrupted or deleted dmg files, especially if a drive is aging.
- Software or macOS Crashes: Kernel panics in Mac, app crashes, or failed OS updates can leave your Mac in an unstable state. You may lose unsaved data if the system crashes, or you might even end up with a Mac that won’t boot, leading to potential data inaccessibility. Specific errors like the Pink Screen of Death in Mac or Disk Utility’s First Aid Repairing Process has Failed can signal a serious software/hardware conflict.
- Malware/Ransomware: Even a benign virus can sometimes cause AFPS and HFS file corruption on Mac. Ransomware on Mac is although rare but we can’t ignore it entirely.
- iCloud or Sync Issues: Files saved in iCloud Drive or on external services (Dropbox, Google Drive) are generally safe, but Mac vfs sync issues, sync errors or accidental deletions in the cloud can propagate to your Mac. For example, if you delete a file in iCloud.com, empty your Trash there, and put back option in Trash is not working,it goes for good unless you have another backup.
- Backup Failures:Ironically, relying on a faulty backup can backfire. If your Time Machine backup failed, you assume something is backed up when it isn’t, or Mac backup disk image could not be accessed,you could think you’ll recover data only to find nothing there.
- Encryption: If you encrypted your Mac’s drive for security reasons and forgot the password, the data in the storage is almost useless because to recover data from an encrypted Mac hard drive, you must have the encryption key.
- Hardware Failure:Old or damaged storage can fail unexpectedly. This includes mechanical failure of HDDs, SSD controller failure, corrupted USB drives, or even logic board issues. Bad sectors on Mac hard drives or corrupt Mac SSD can also kill the system. When hardware fails, it can result in a non-booting Mac due to corruption in the file system and thus make data physically unreadable.
- External Factors: Spills, drops, fire, floods, or even theft… anything can be hazardous and create problems for you. If your Mac or an external drive gets physically damaged, that data might be permanently lost without professional intervention Water-damaged Mac data recovery is quite difficult yet not impossible.
- Search for Time Machine in the Applications and double-click the Time Machine icon.
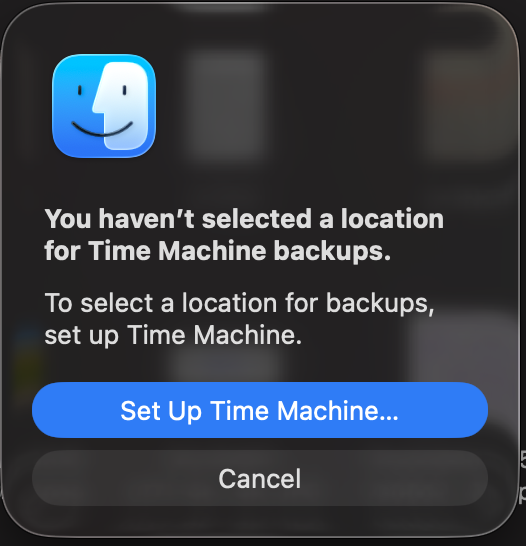
- If you get the below pop-up, it means that you don’t have an active Time Machine backup and this method is not for you.
- In this window, choose the folder that housed your missing files.
- In this Folder, select the file/s you want to restore. If there are too many of them in the backup folder, go ahead and use either the search functionality or the timeline option to find your files.
- Once selected, you can also click the spacebar on your keyboard to preview the file. If you are satisfied with your selection, go ahead and click the Restore button.
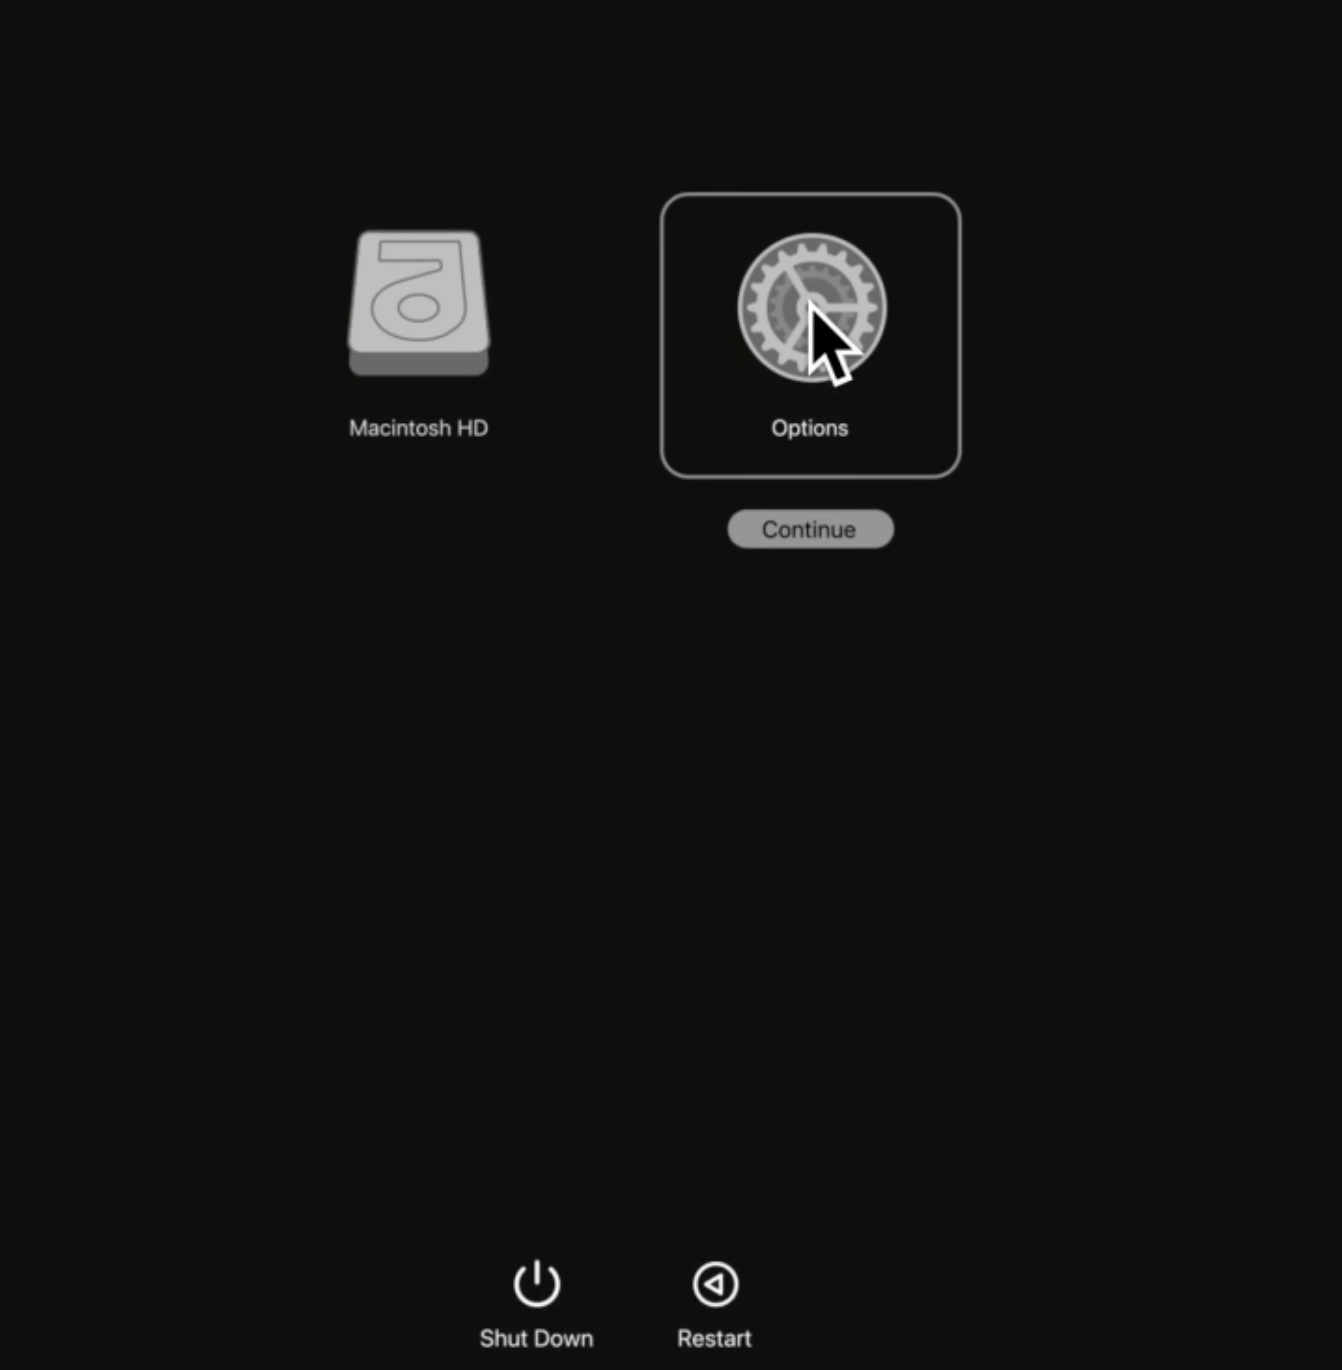
- Restart the Mac and keep holding that power button until you see “Loading Startup Options” and on the screen that opens, choose Options and then Continue. This should launch the Recovery Mode. However, in Intel Macs, you’ll have to hold down Command (⌘) + R to enter macOS Recovery.
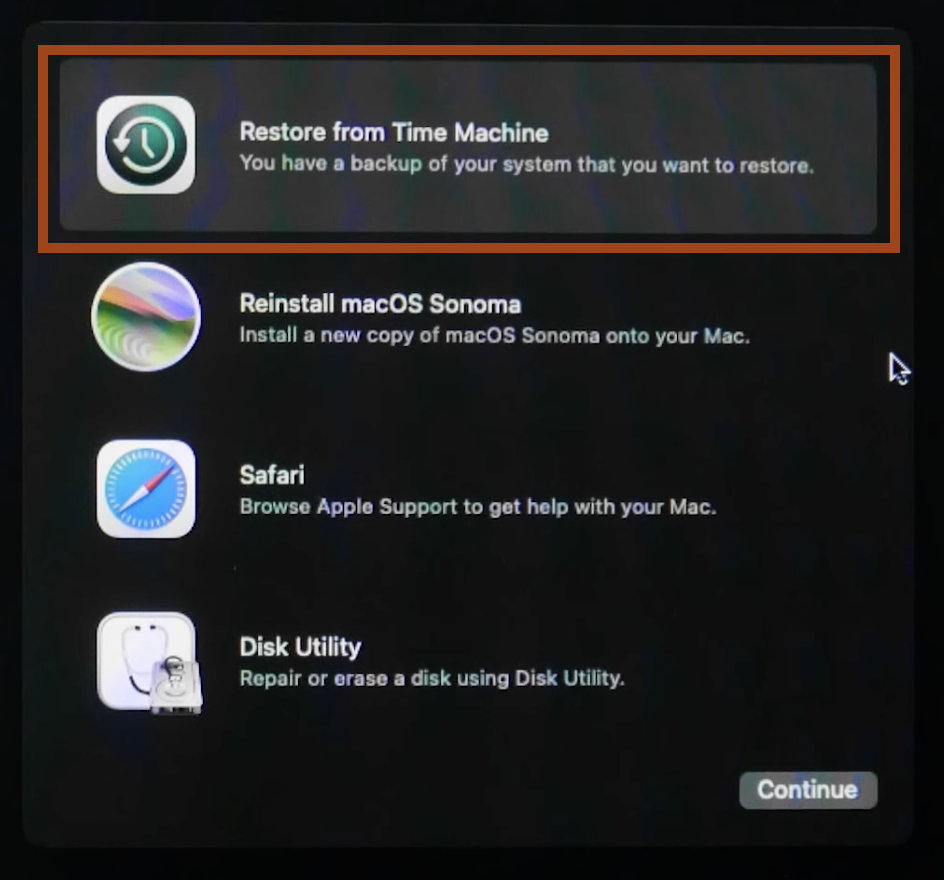
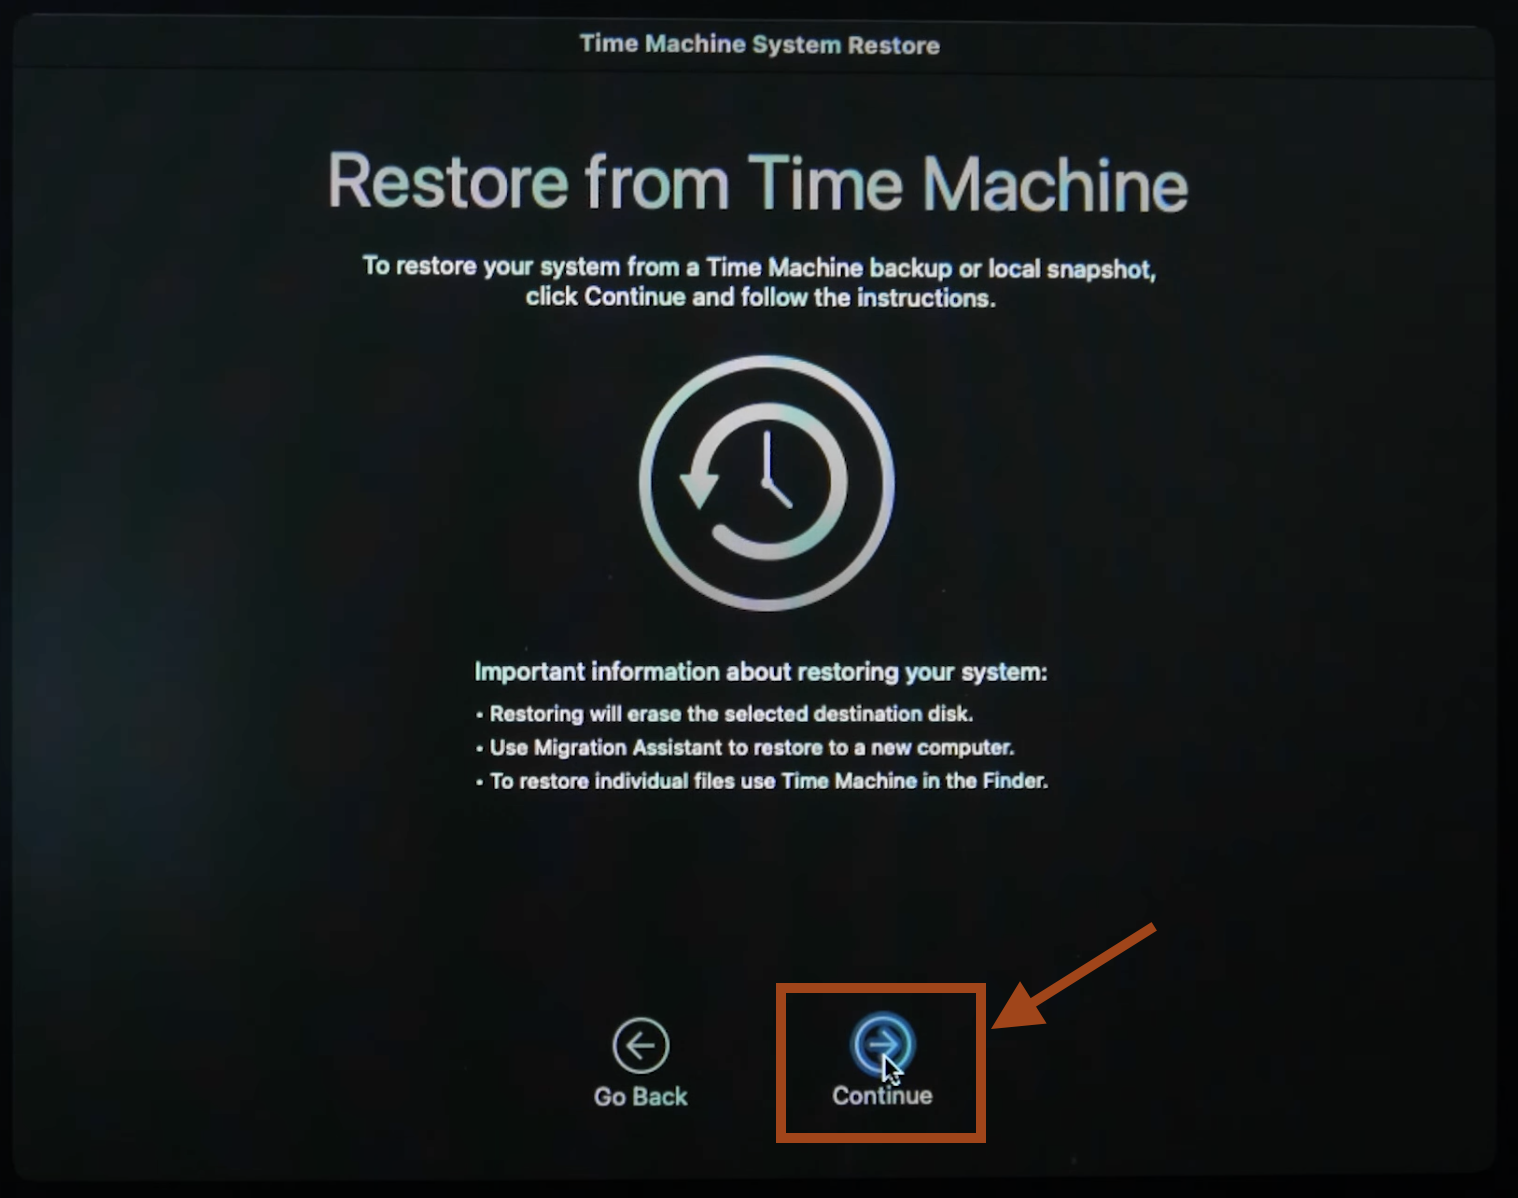
- In Recovery Mode, choose “Restore From Time Machine” from the utilities window and click Continue.
- Read those instructions on the screen carefully and once you’re sure about everything, click that Continue. button.
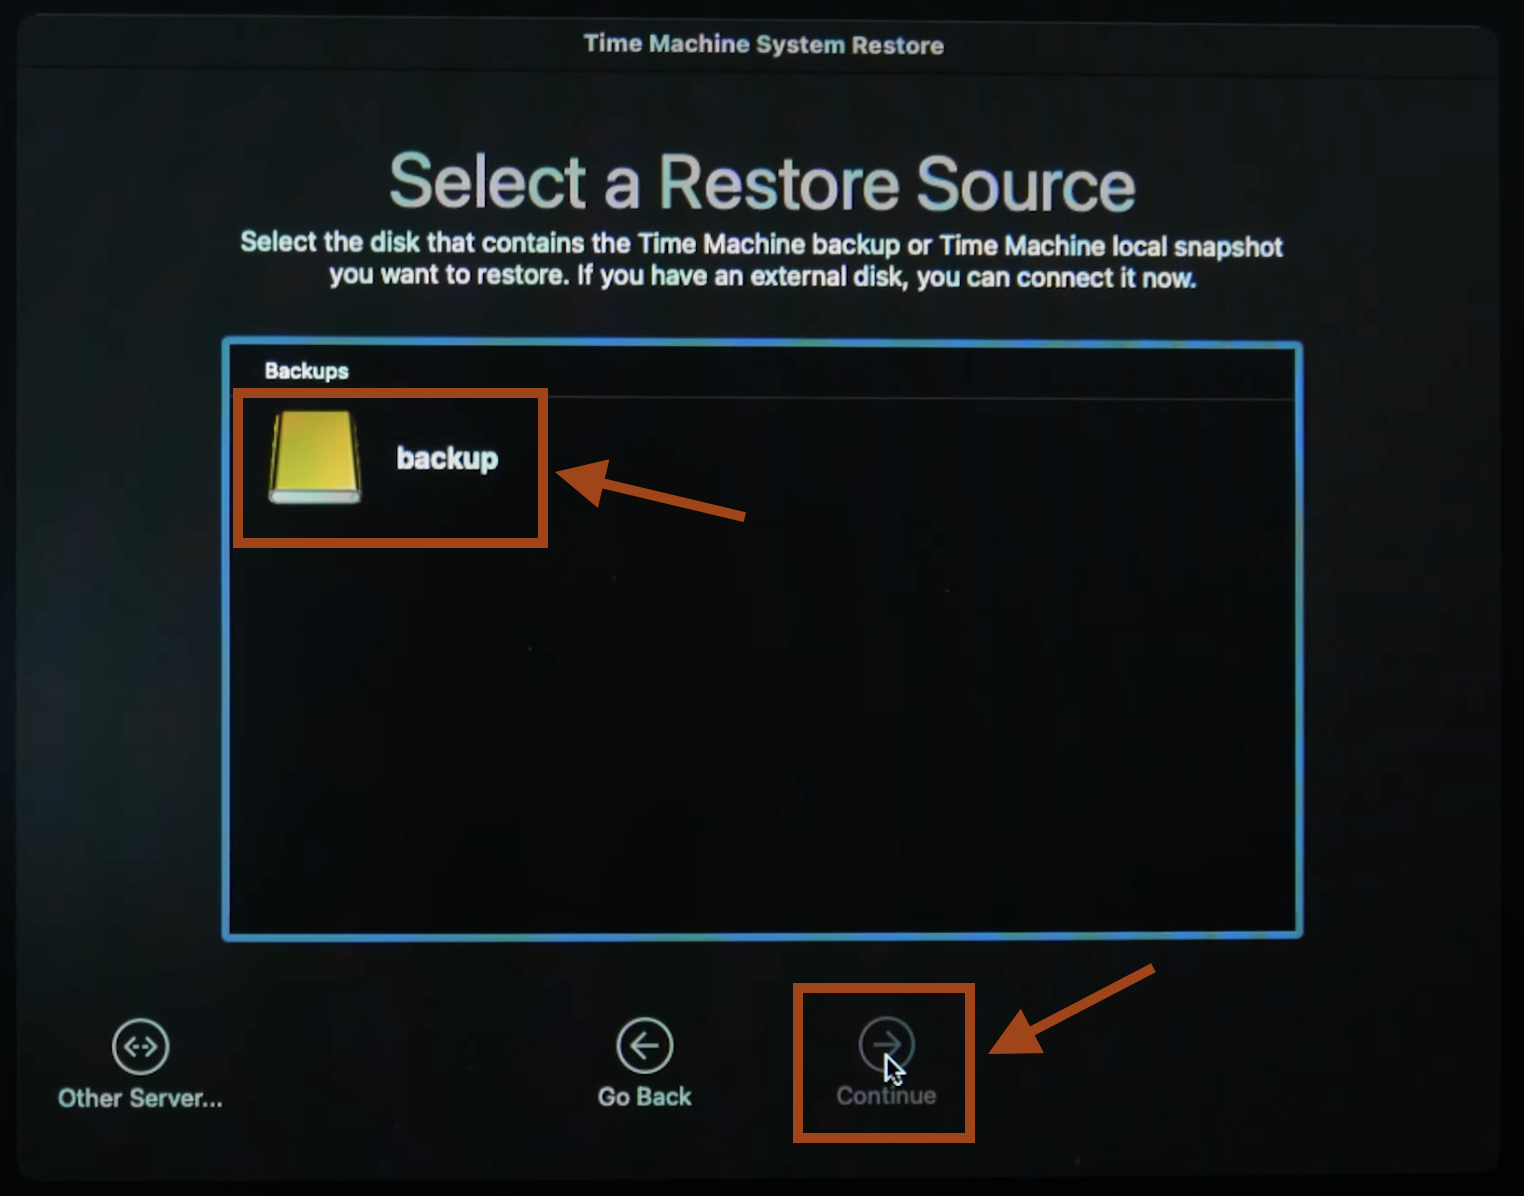
- Pick the volume (if you have not renamed it ever, its titled “Macintosh HD”) and then click Restore.
- Wait while your Mac is replaced with the saved snapshot. When it reboots, all your files (as of the backup date) should be back.
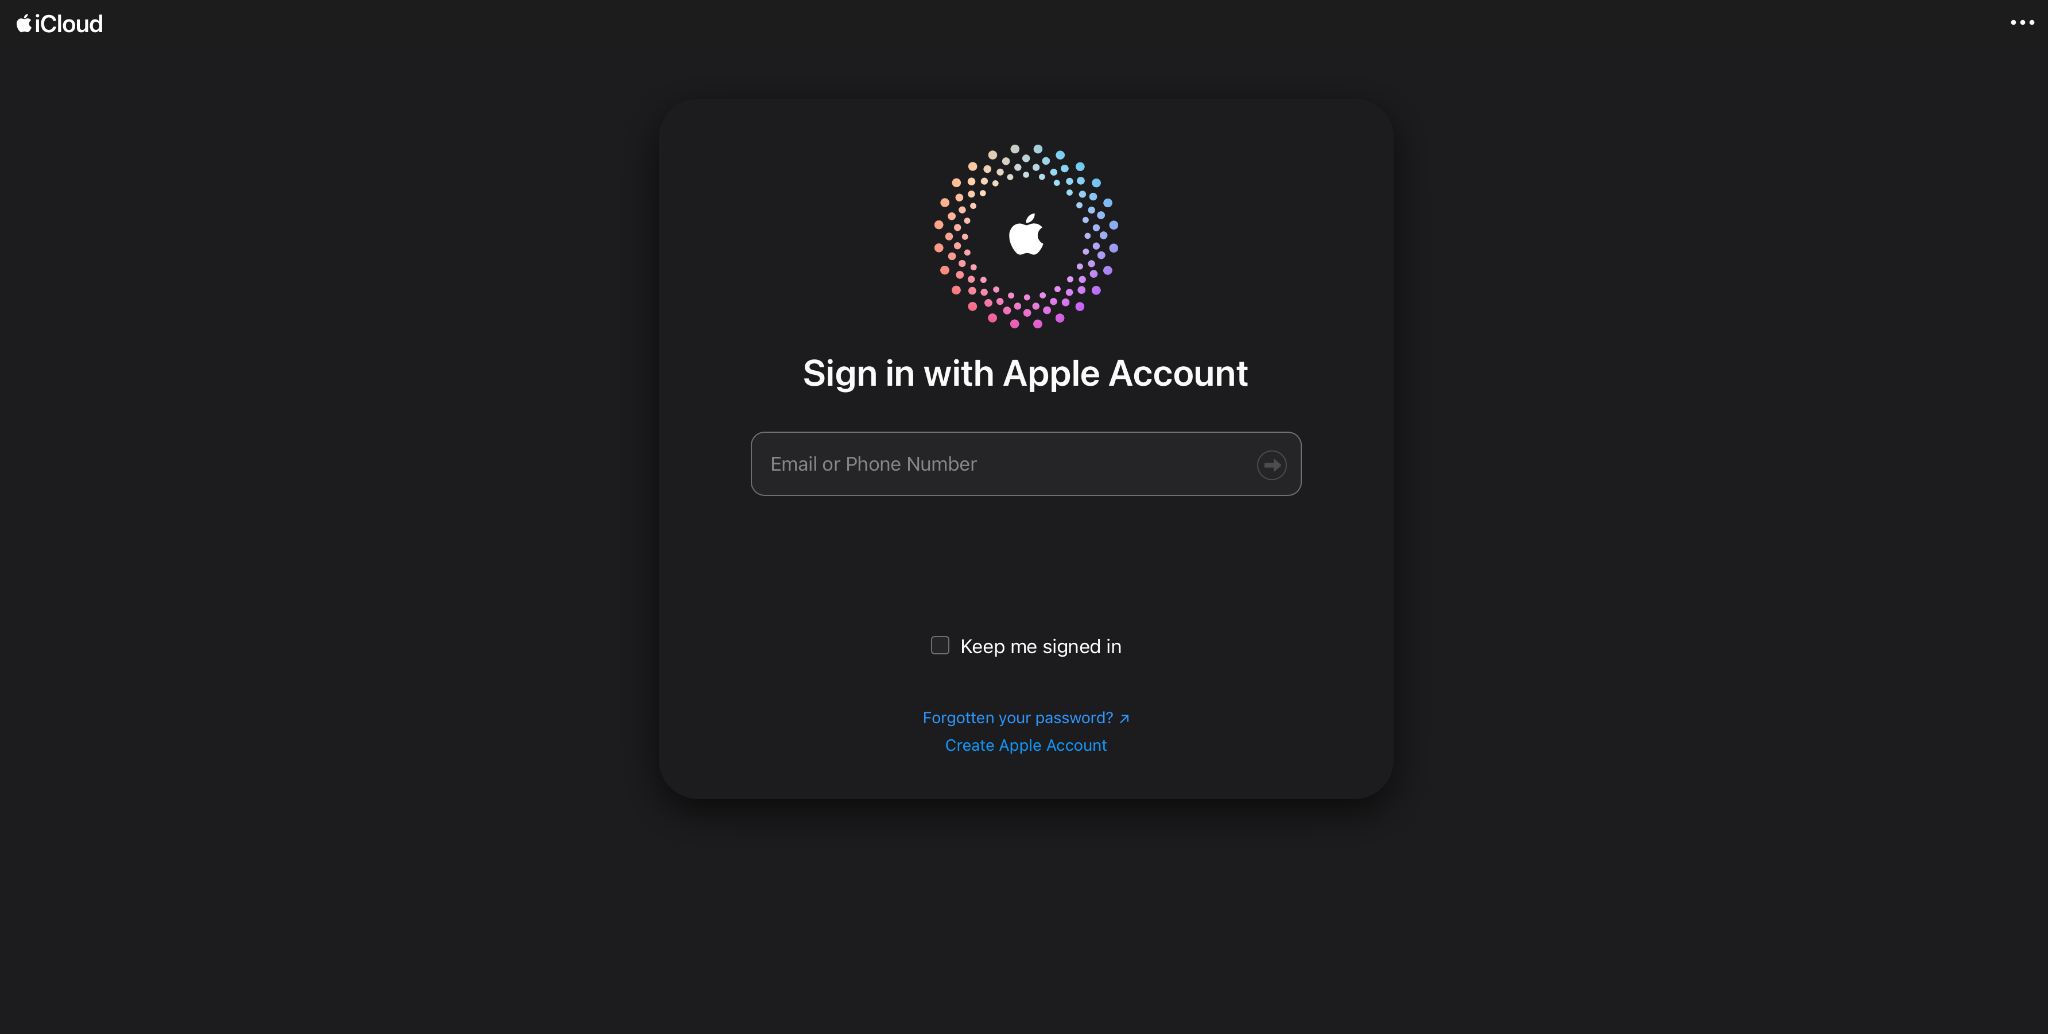
- On your Mac or another device, open a browser and go to iCloud.com. Sign in with your Apple ID.
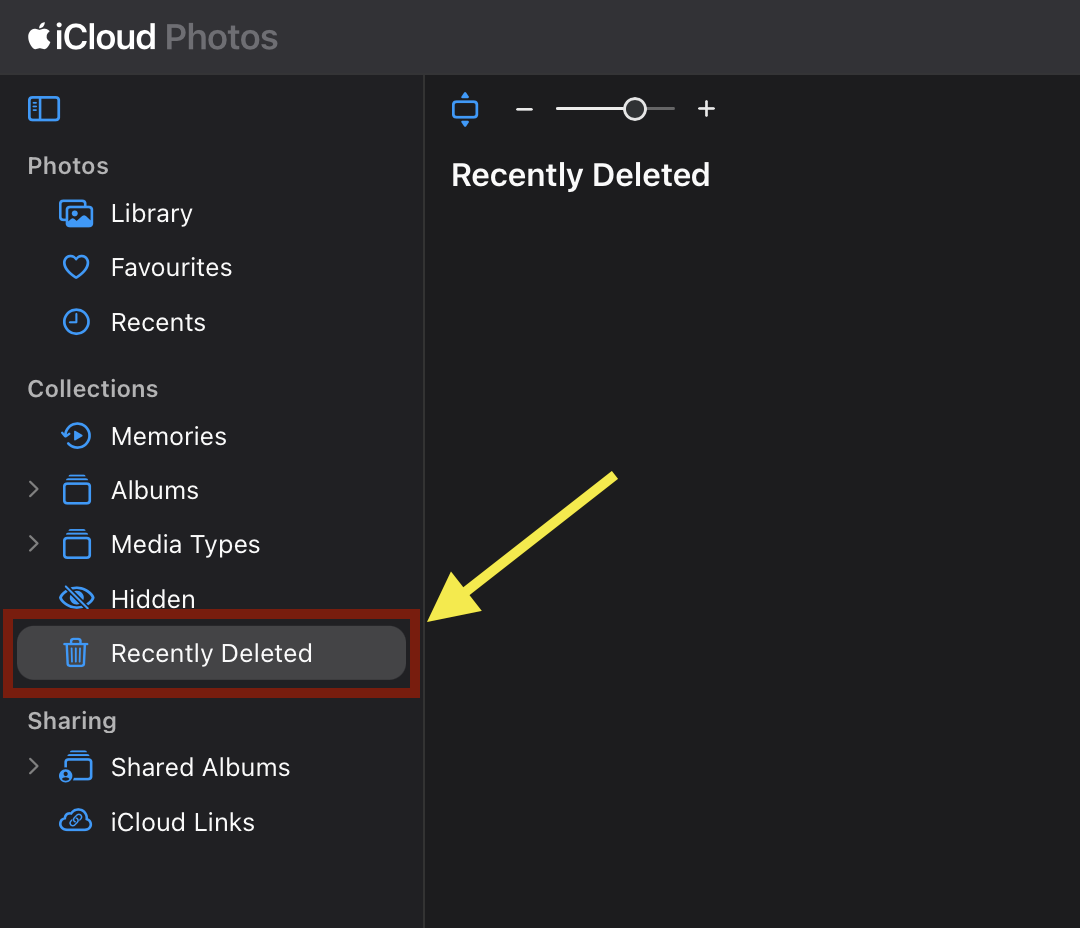
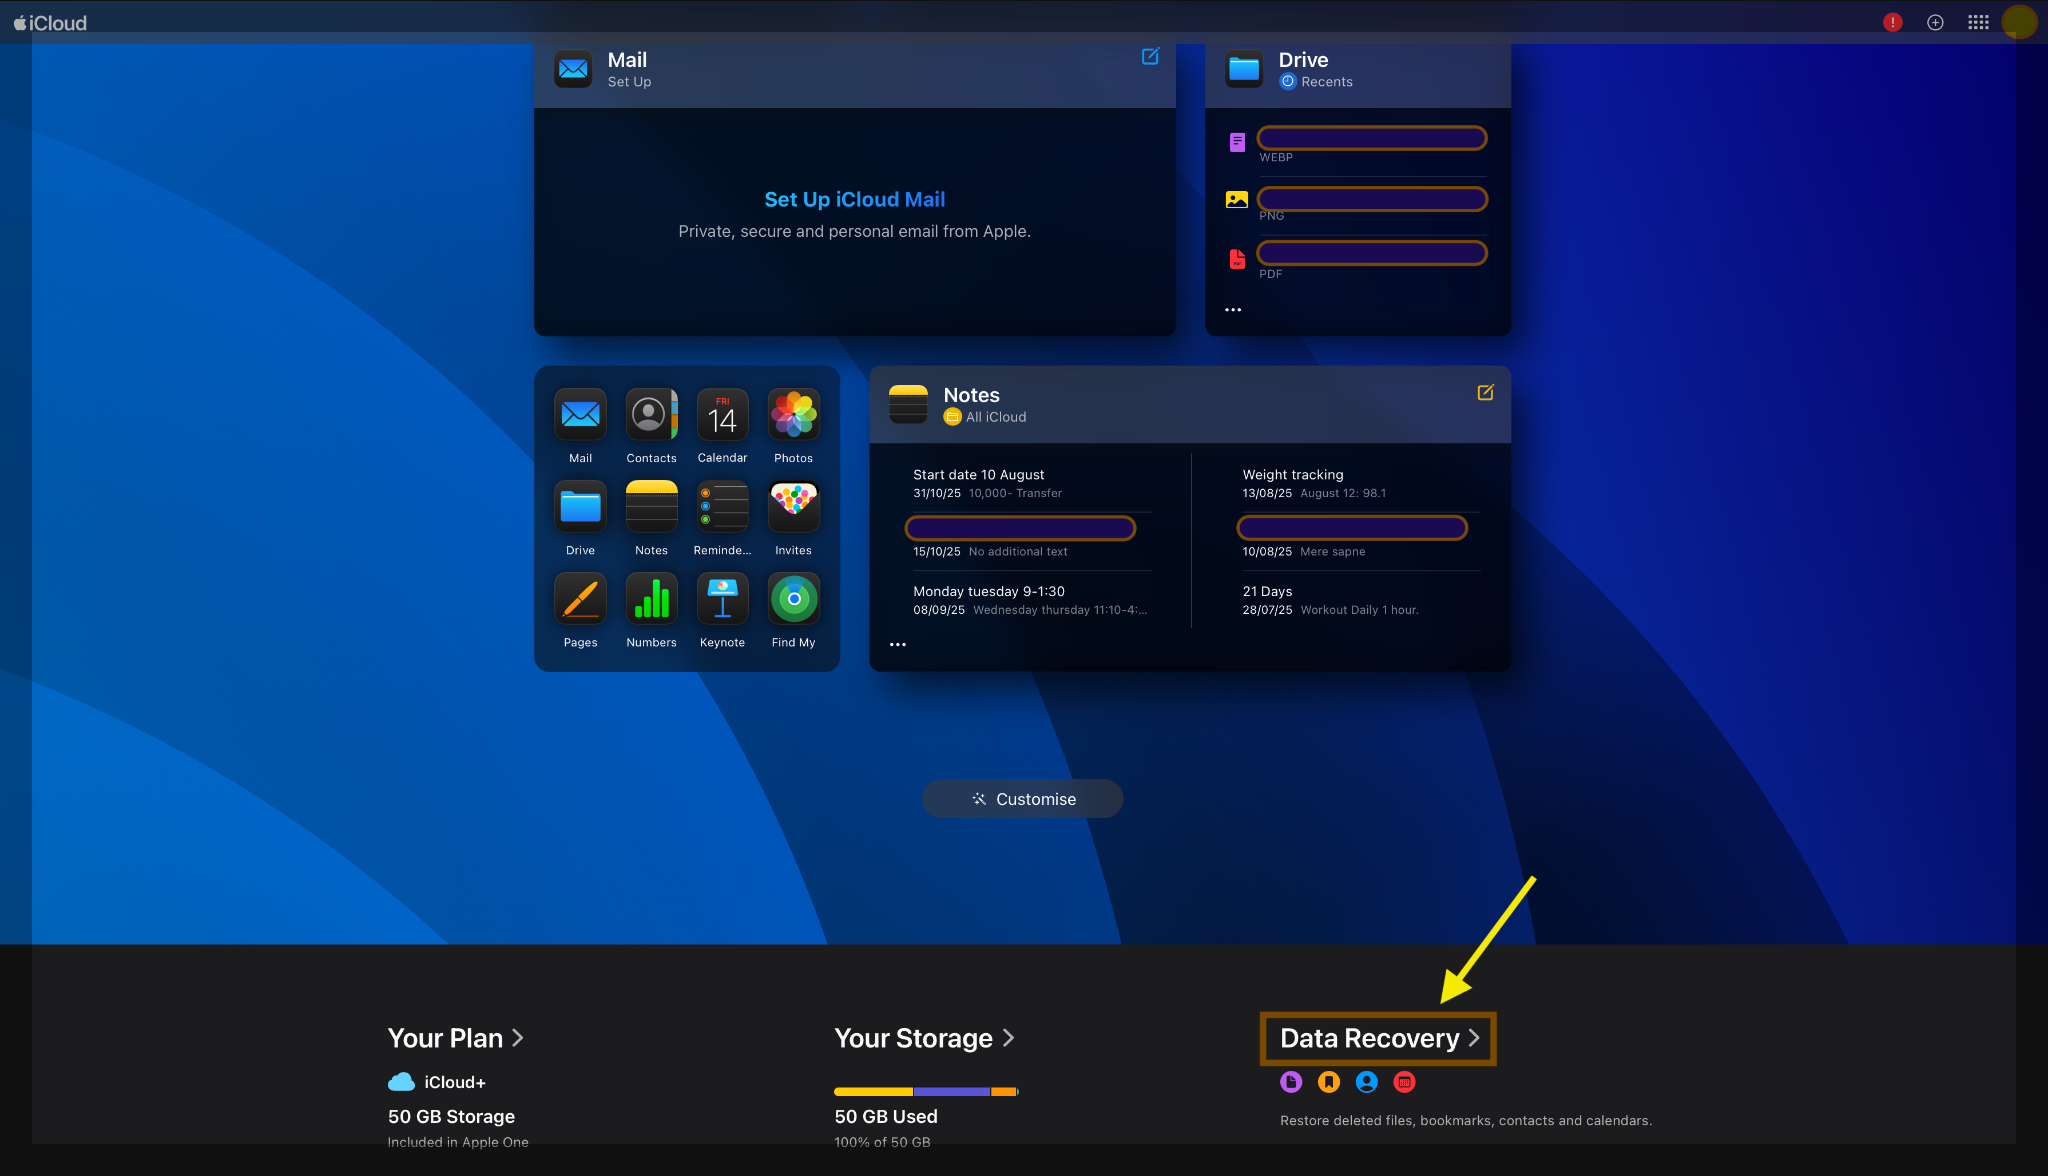
- Click iCloud Drive, Photos, Notes, or other relevant app. Check “Recently Deleted” within each (e.g. iCloud Drive > Recently Deleted, Photos > Recently Deleted) to see if your file is there. If found, restore it.
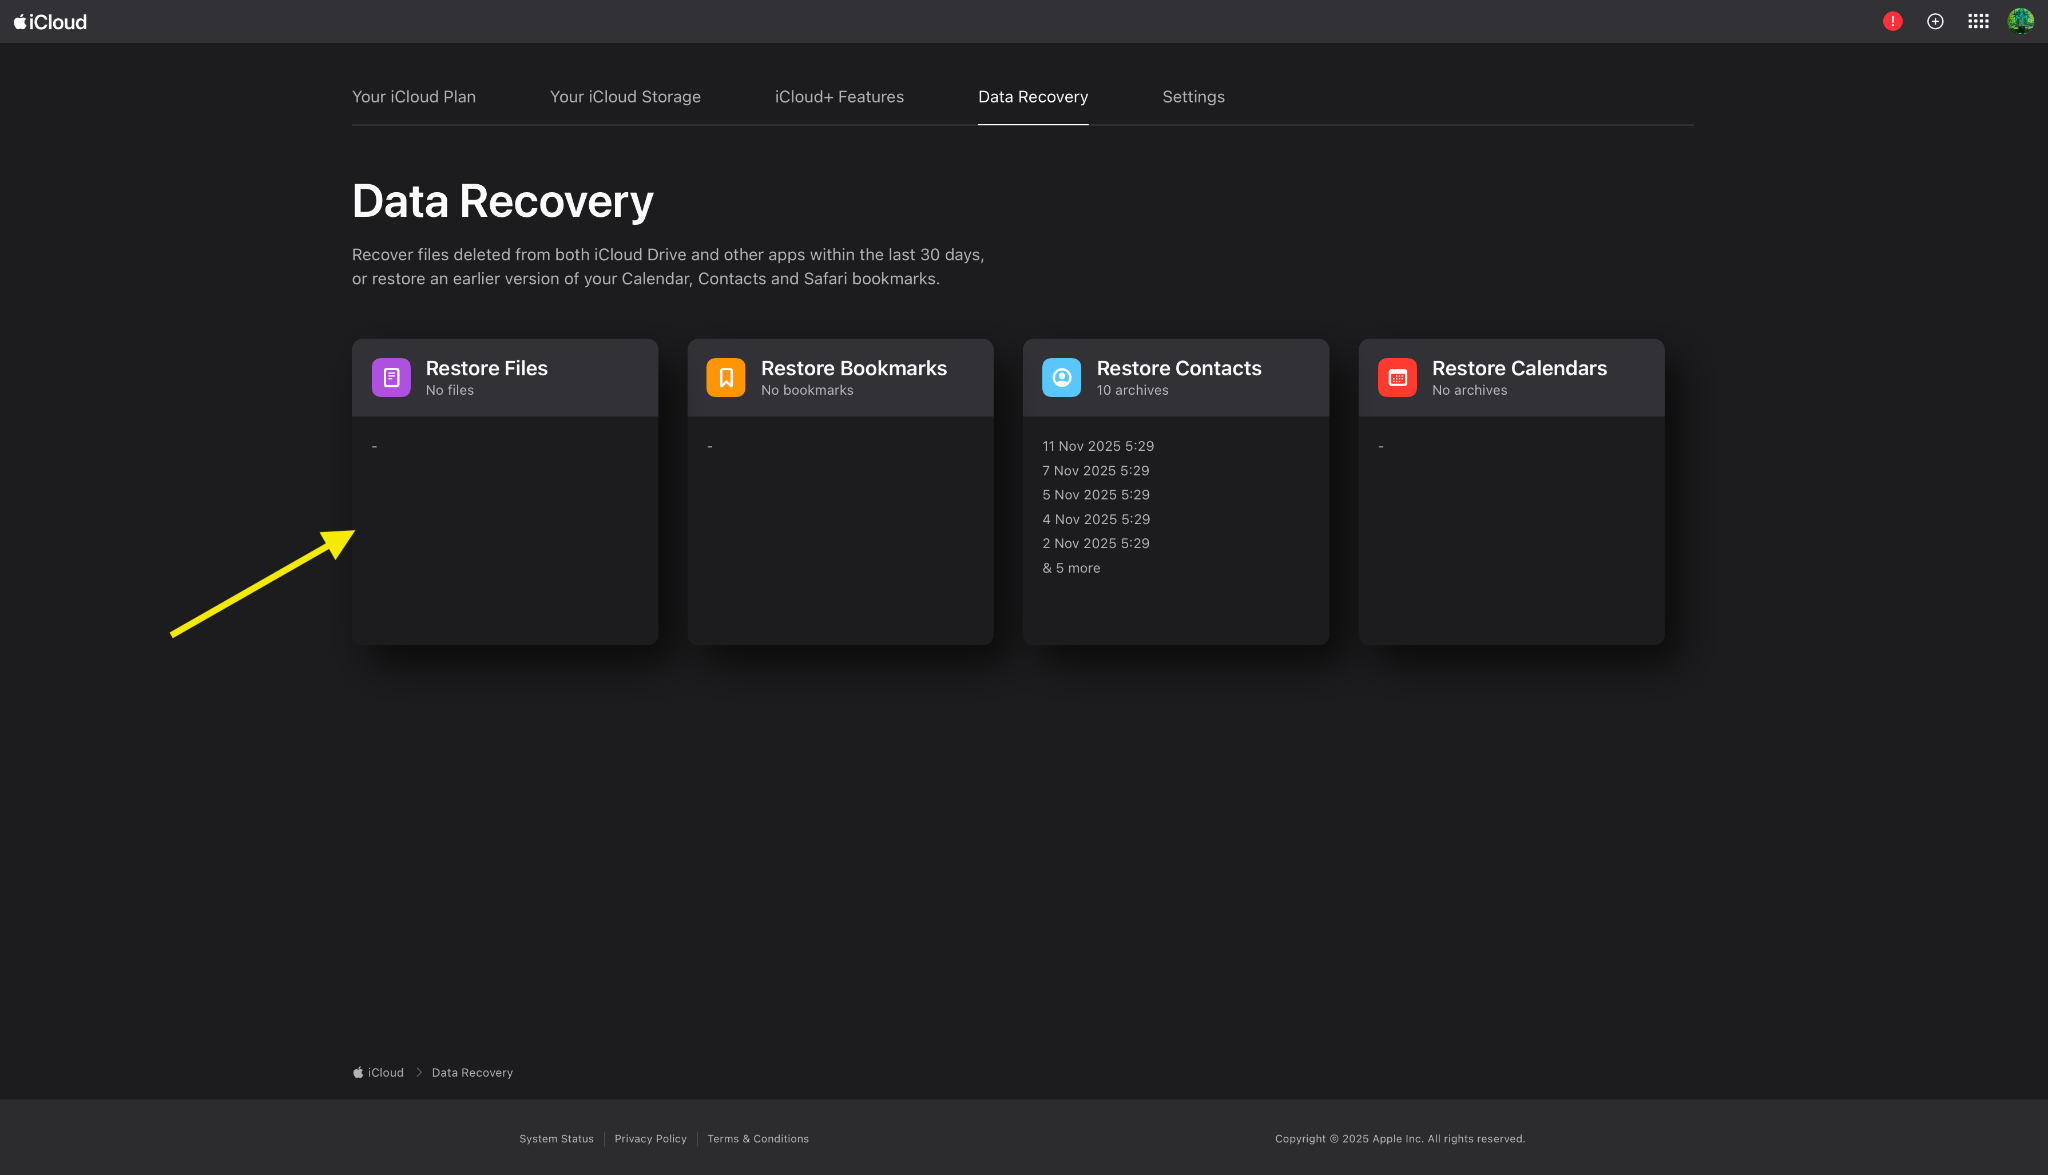
- If you couldn’t find anything, go ahead and scroll down to the bottom of the interface. Find Data Recovery at the bottom-right corner.
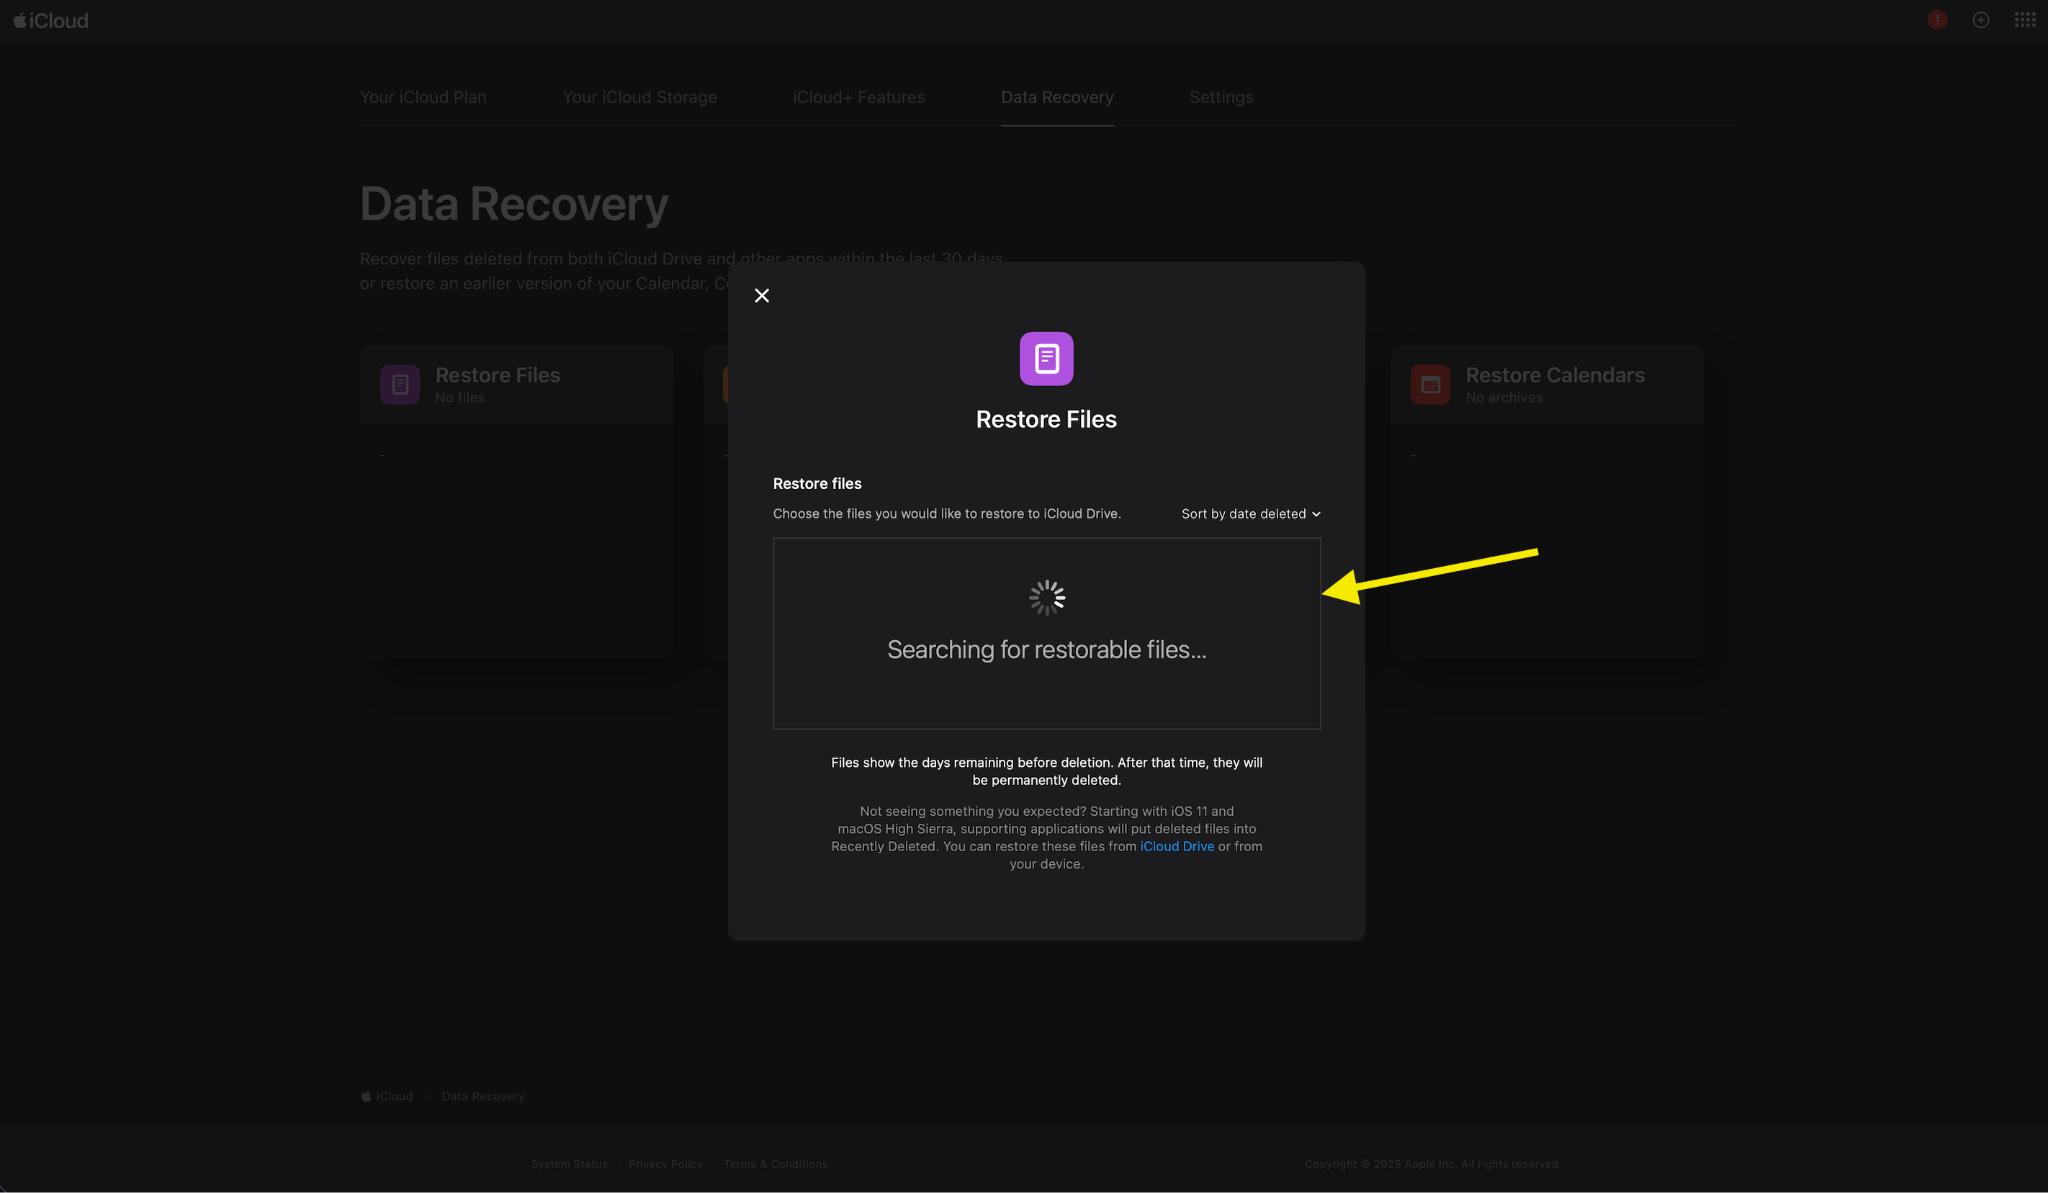
- Go ahead and click the Restore Files tile..
- The system will look for restorable files and list them in a box, from where you can restore them with a click of a button.
- If you use Dropbox or Google Drive, go and log into those web interfaces as well and recover or download files.
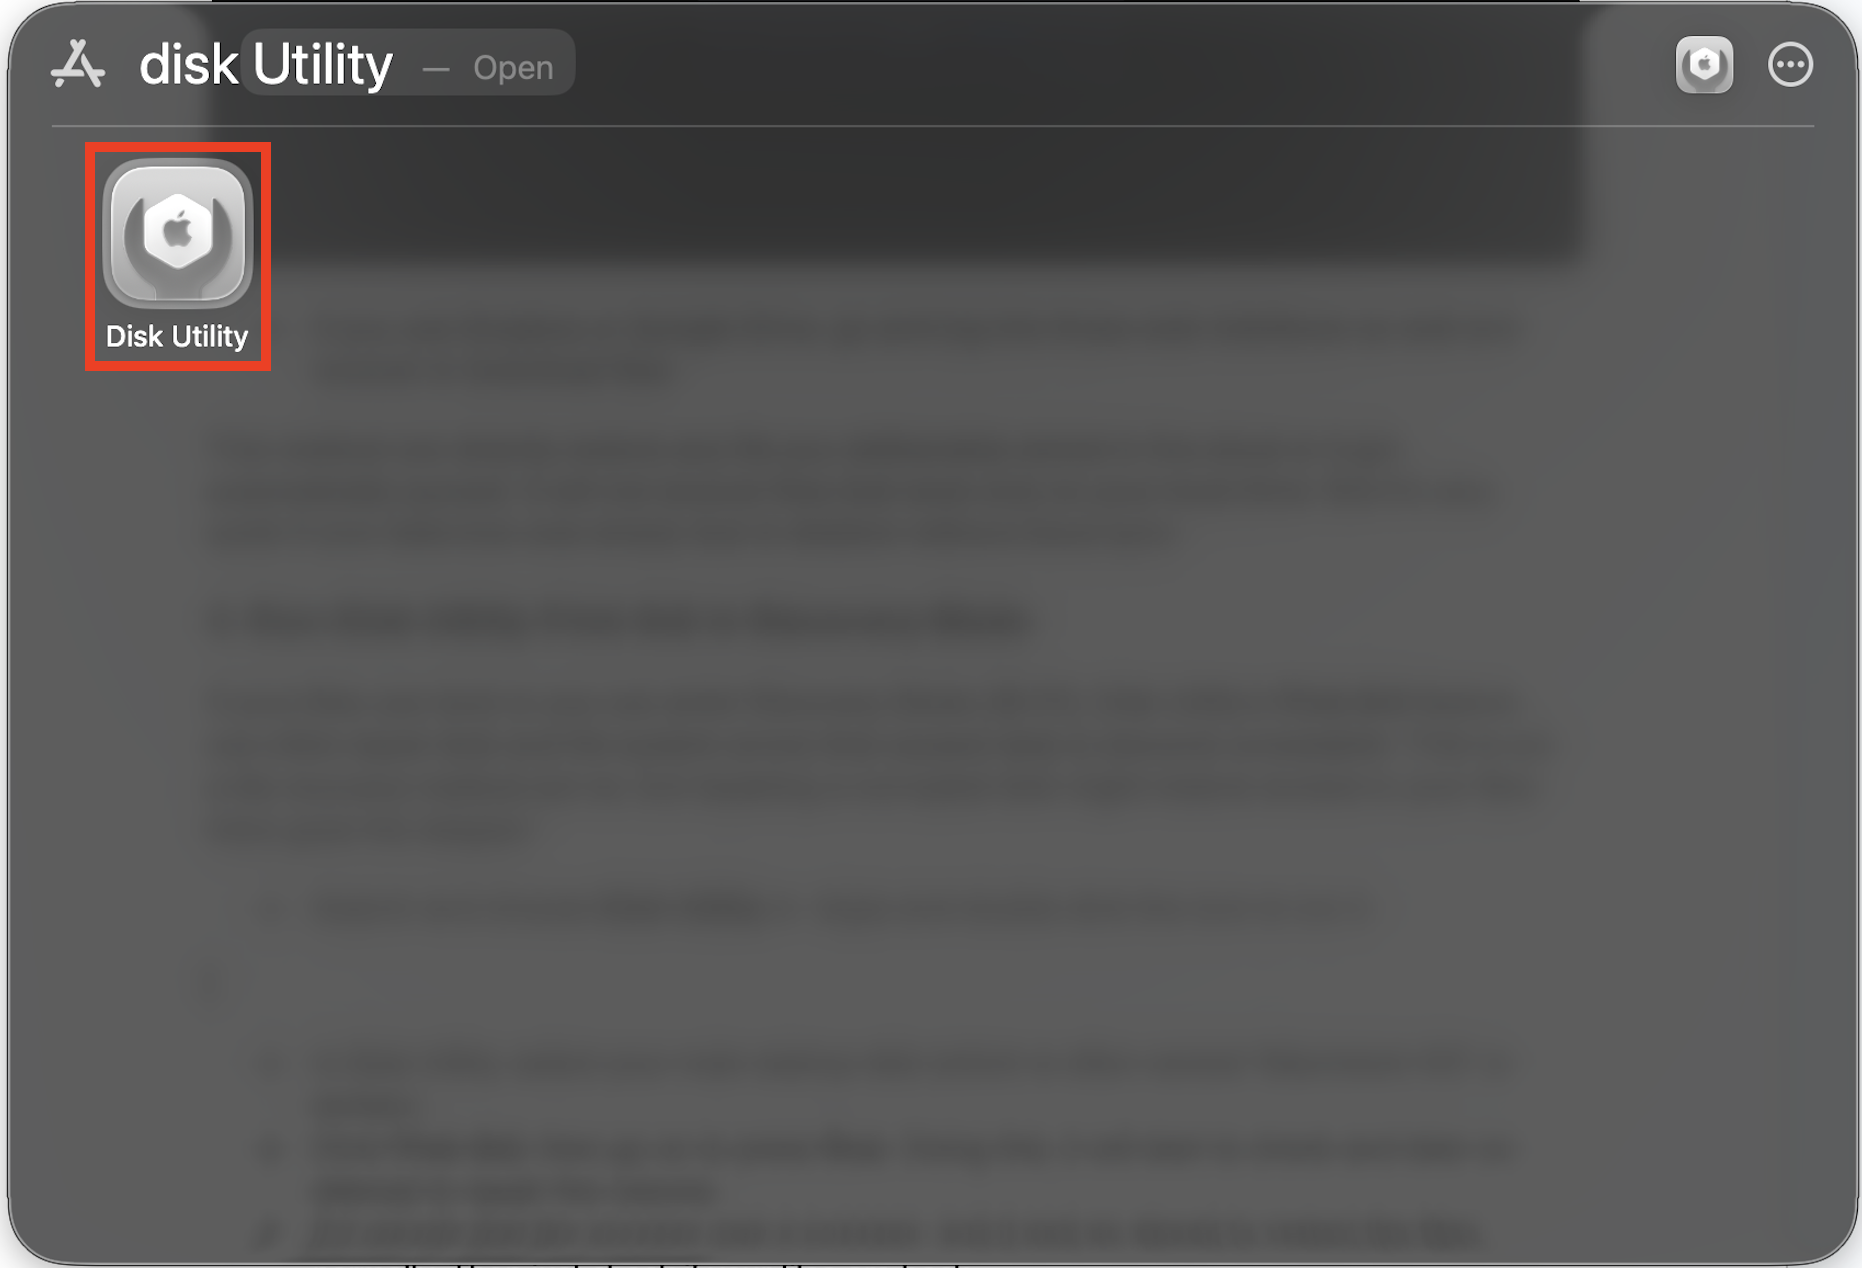
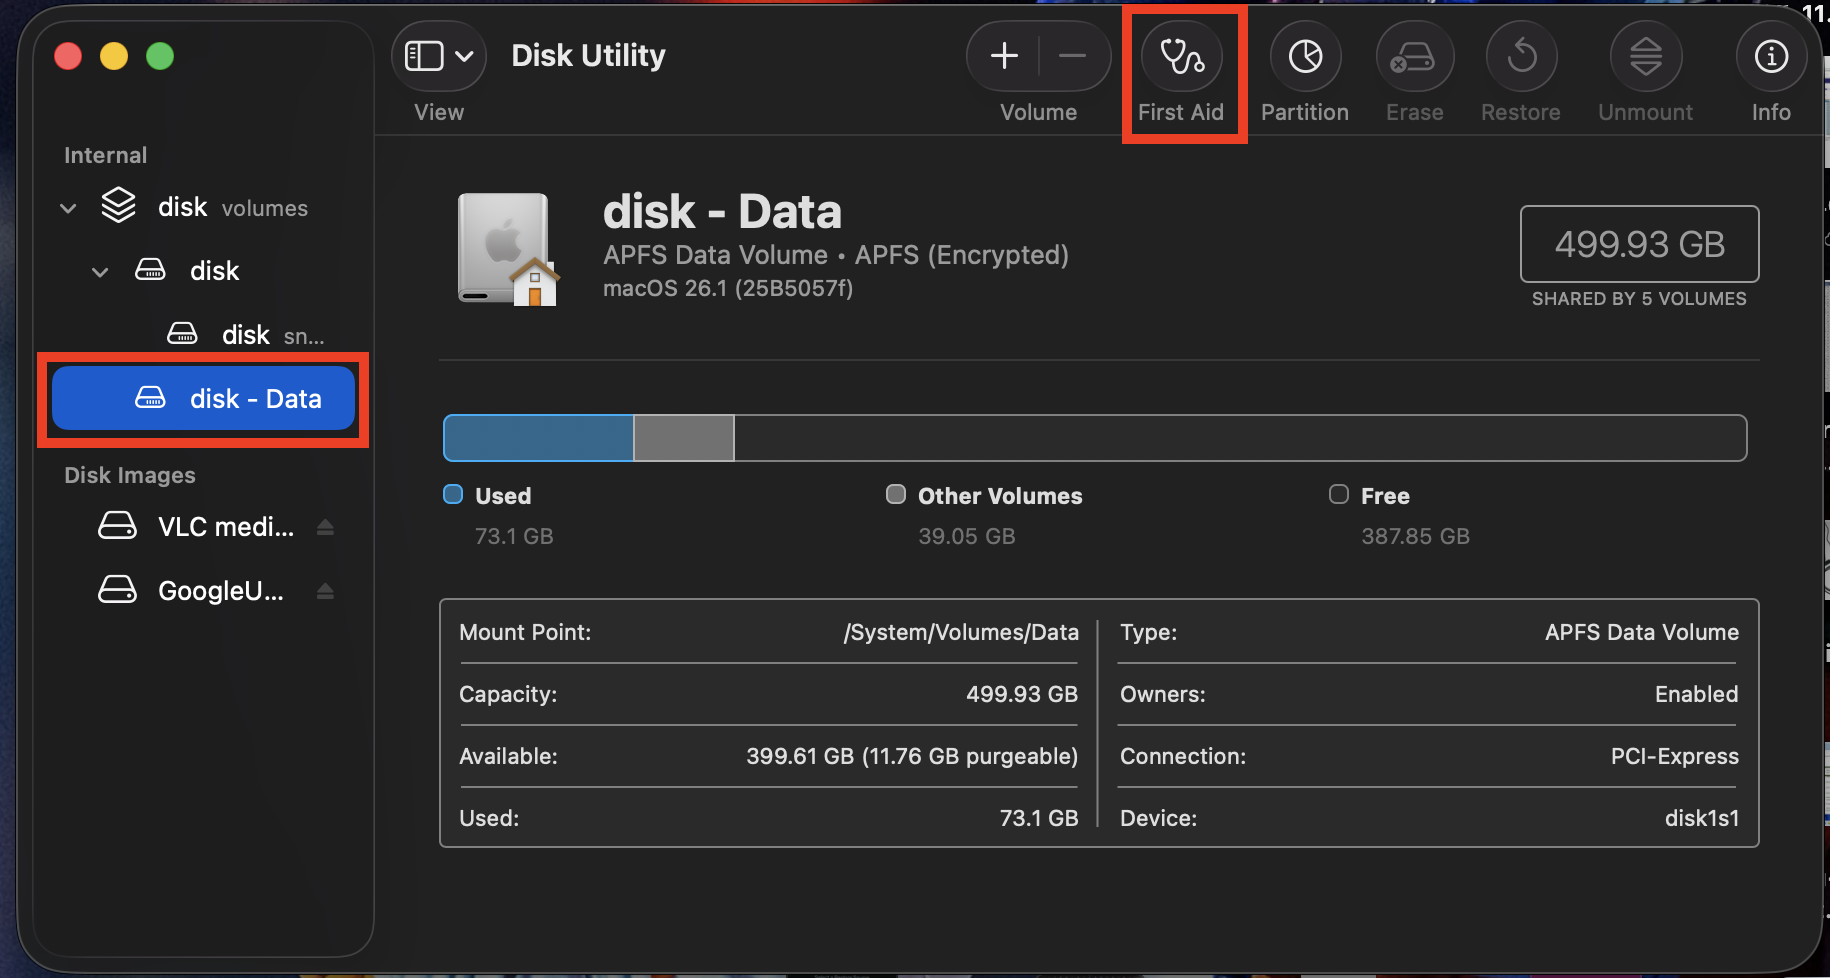
- Search and choose Disk Utility in Apps and double-click the icon to run it.
- In Disk Utility, select your main startup disk, which is often named “Macintosh HD or disk”.
- Click First Aid, then go on to press Run Doing this, it will start to check and later on attempt to repair the volume..
- If it reports that the process was a success, quit it and go ahead to restart the Mac normally. Then just check if your files are back.
- Shut down both Macs. You’ll need a Thunderbolt or USB-C cable or if you have a couple of old Macs, the cable has to be a FireWire.
- Connect the two Macs with the cable, whichever is applicable for your system.
- On the Mac from which the files aren’t accessible to you, press the power button and immediately hold T until a Thunderbolt or USB icon appears on screen (or on older Macs, a FireWire icon).
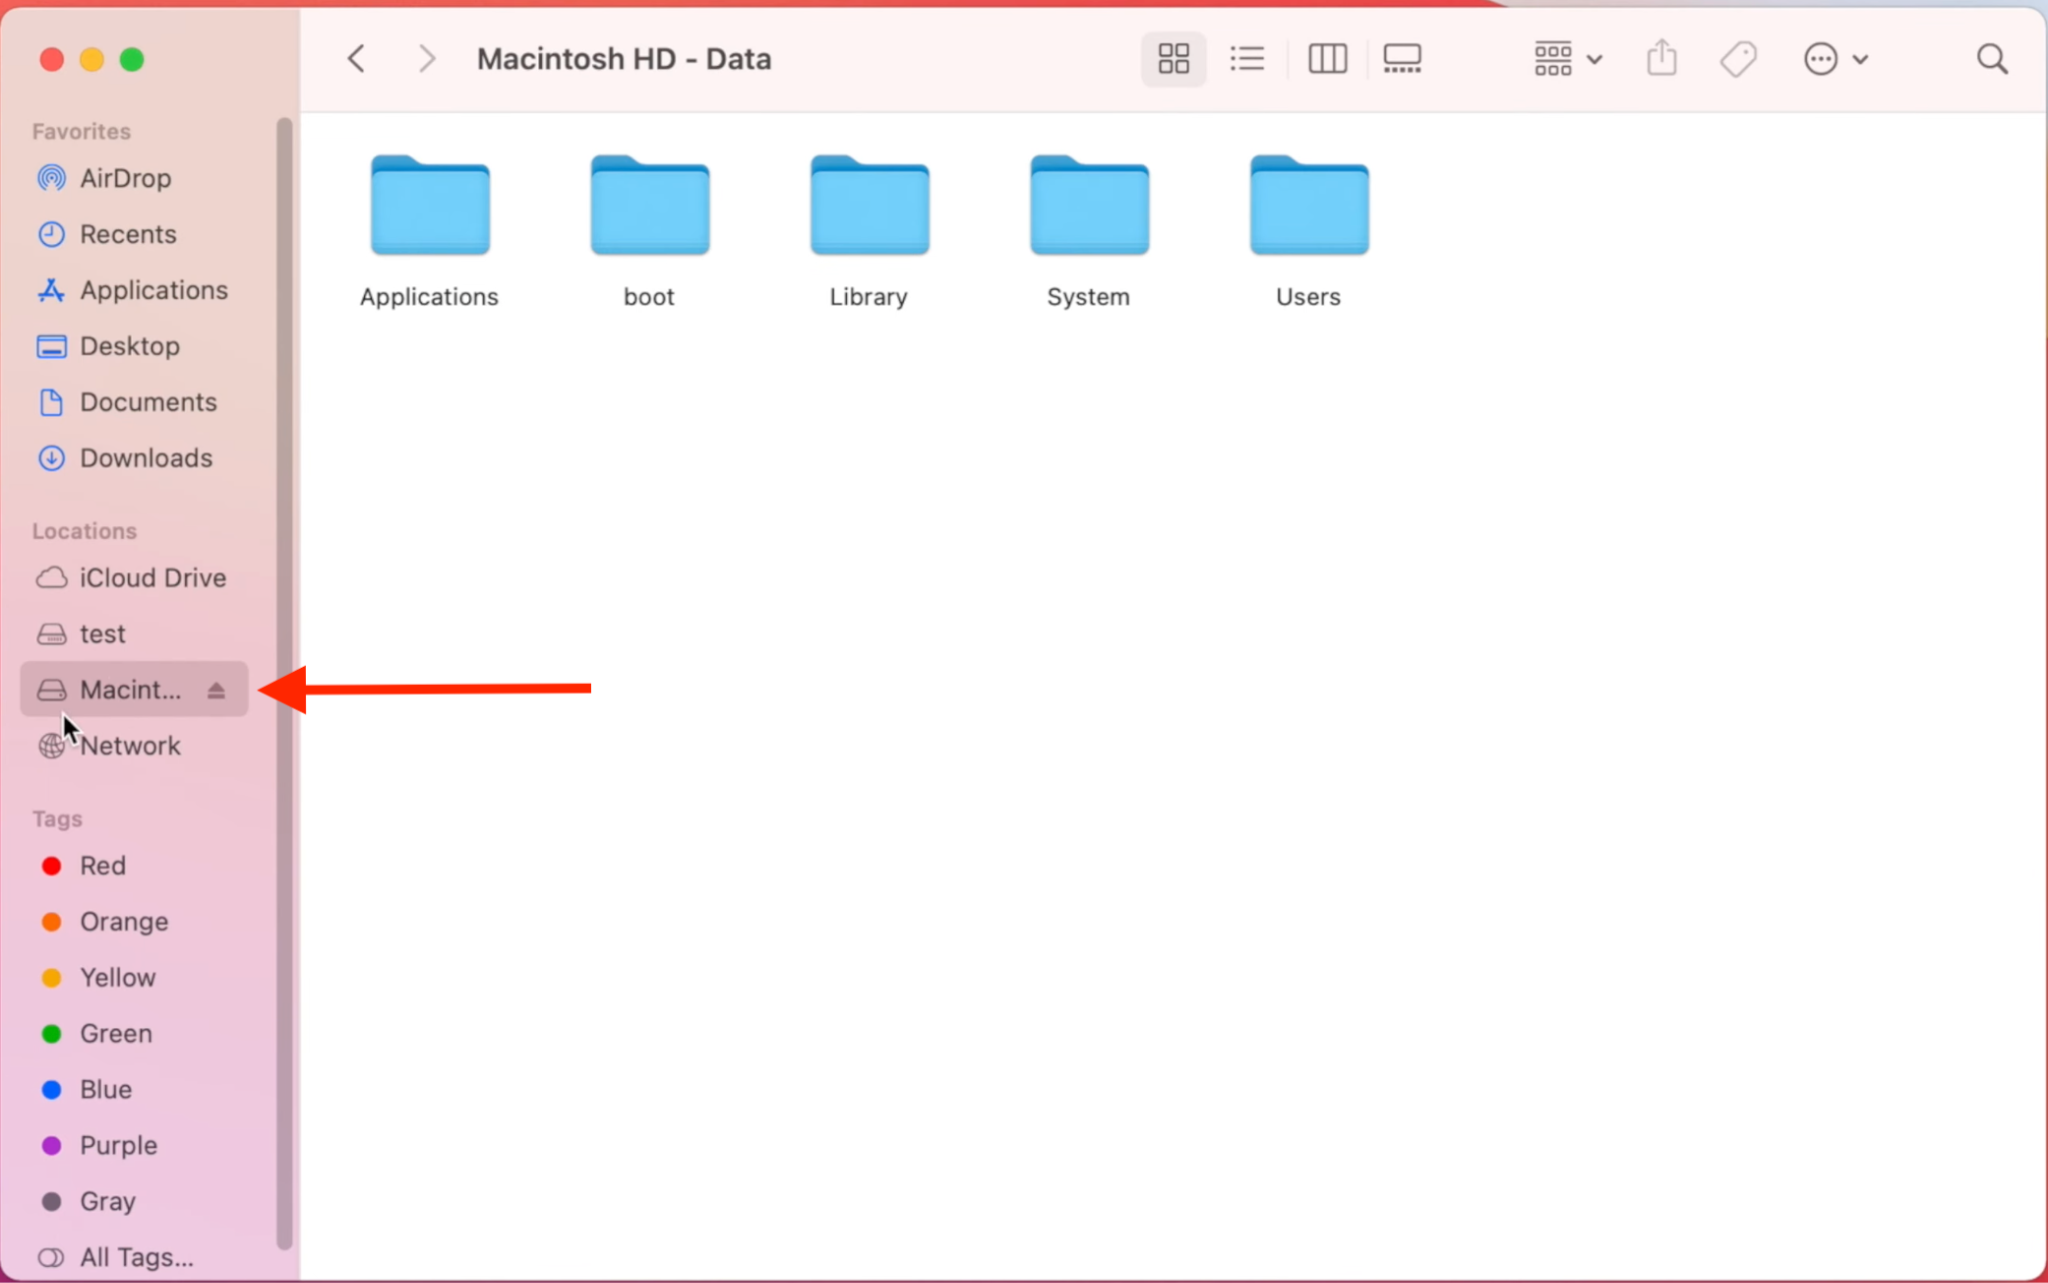
- The Mac’s drive (where the files are not accessible anymore drive) will now mount on the host Mac as an external disk. For your reference, its icon appears on the left navigation bar in the Finder.
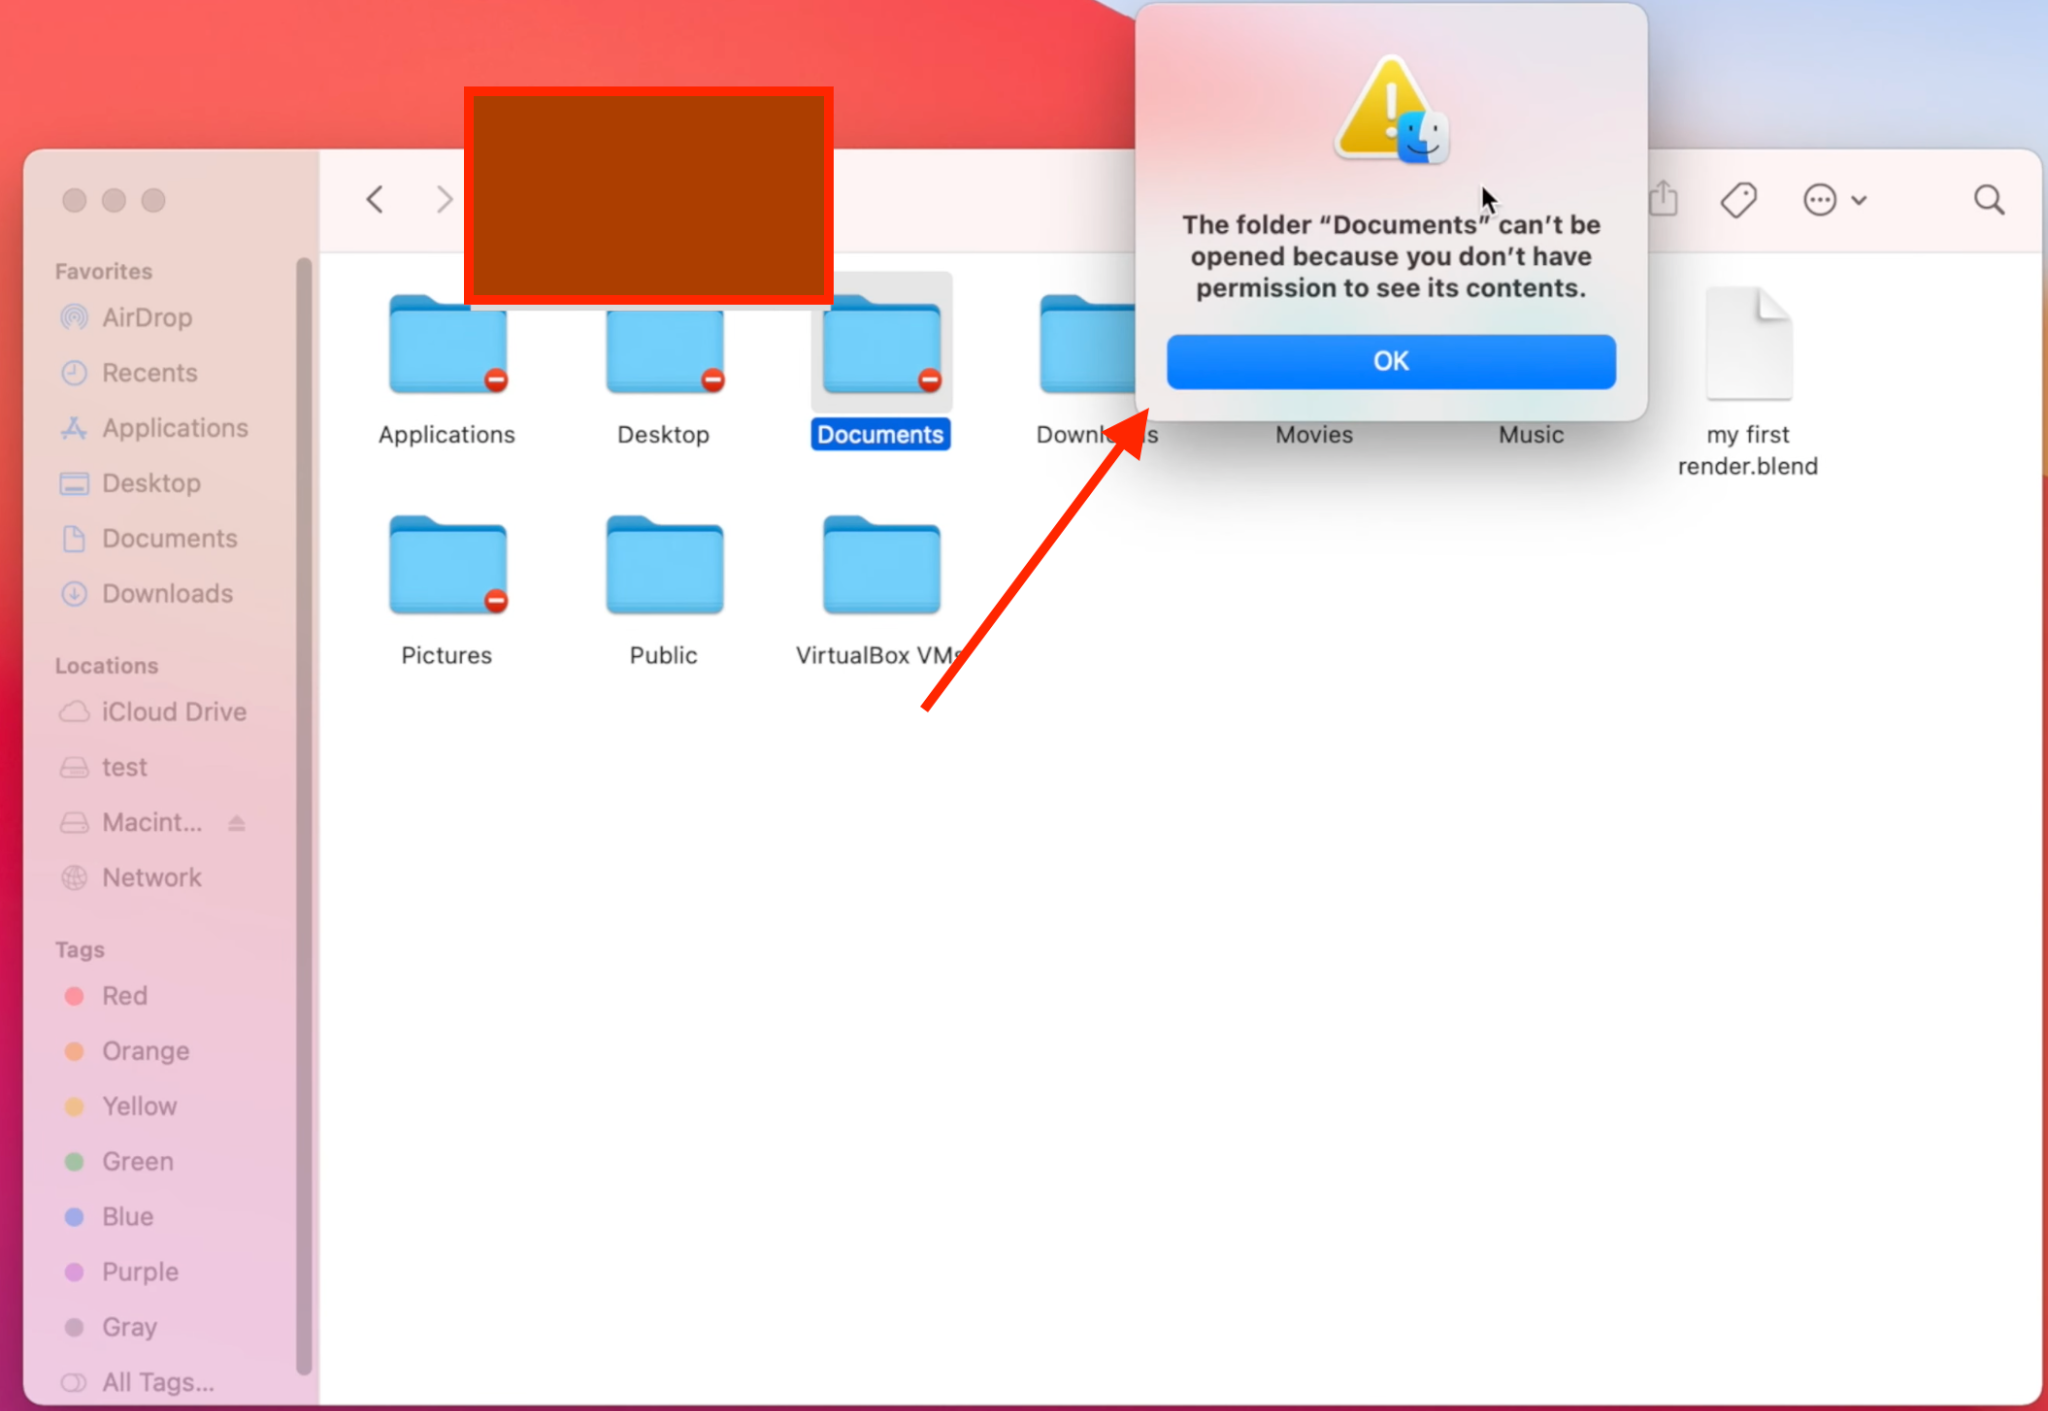
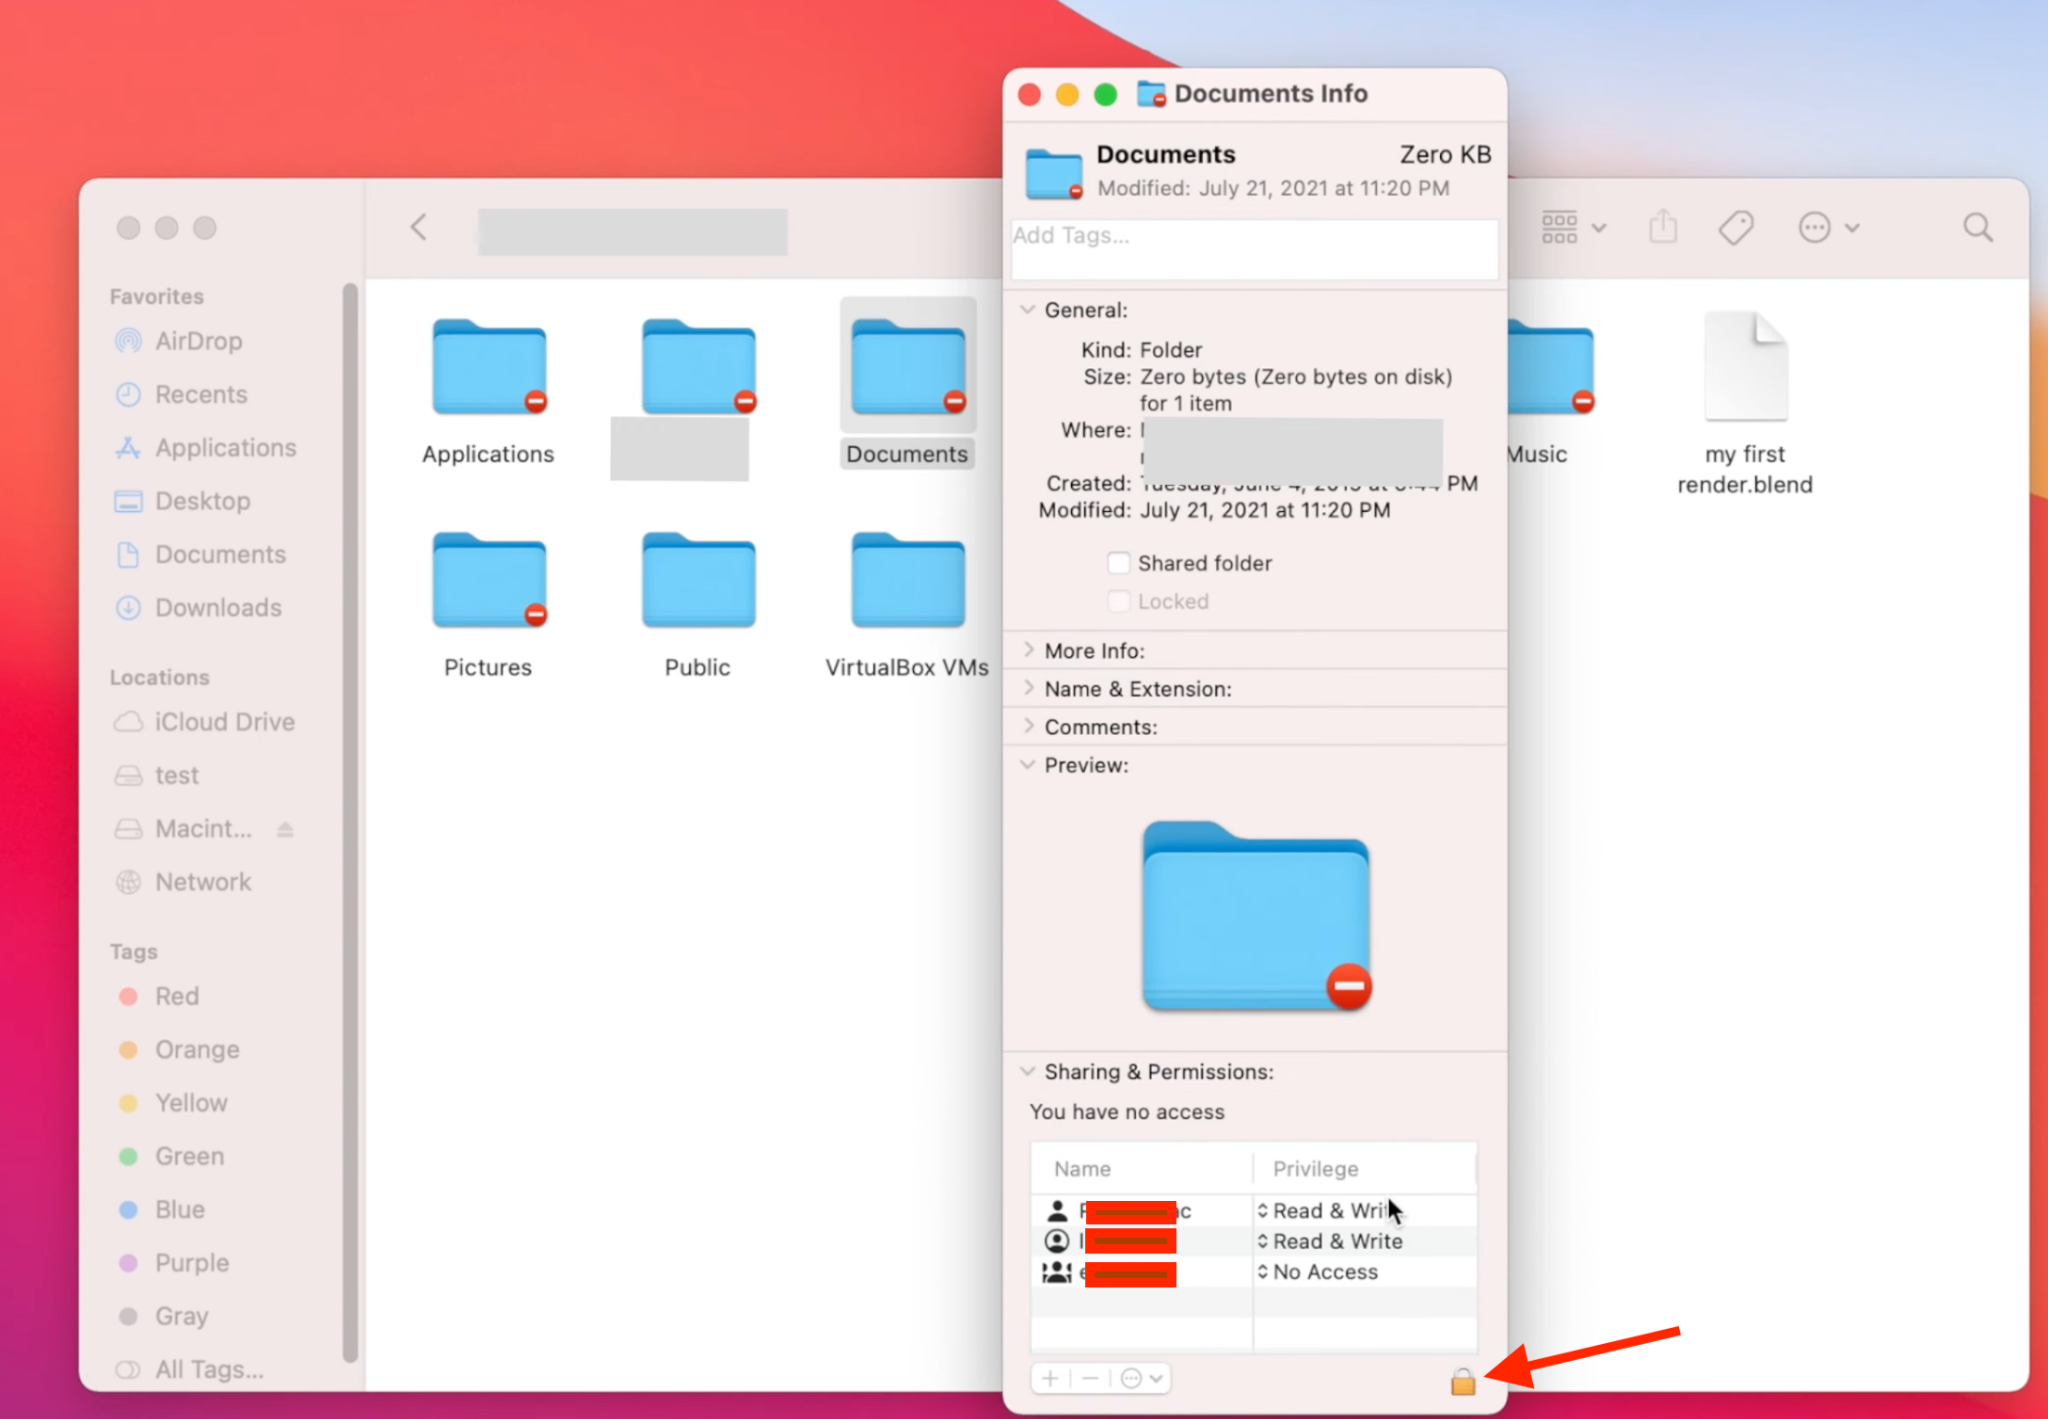
- On the host Mac, open Finder and locate the external disk. Here, you will be able to see all those folders of yours that are on the affected Mac’s drive but you will also find out that they are not accessible yet.
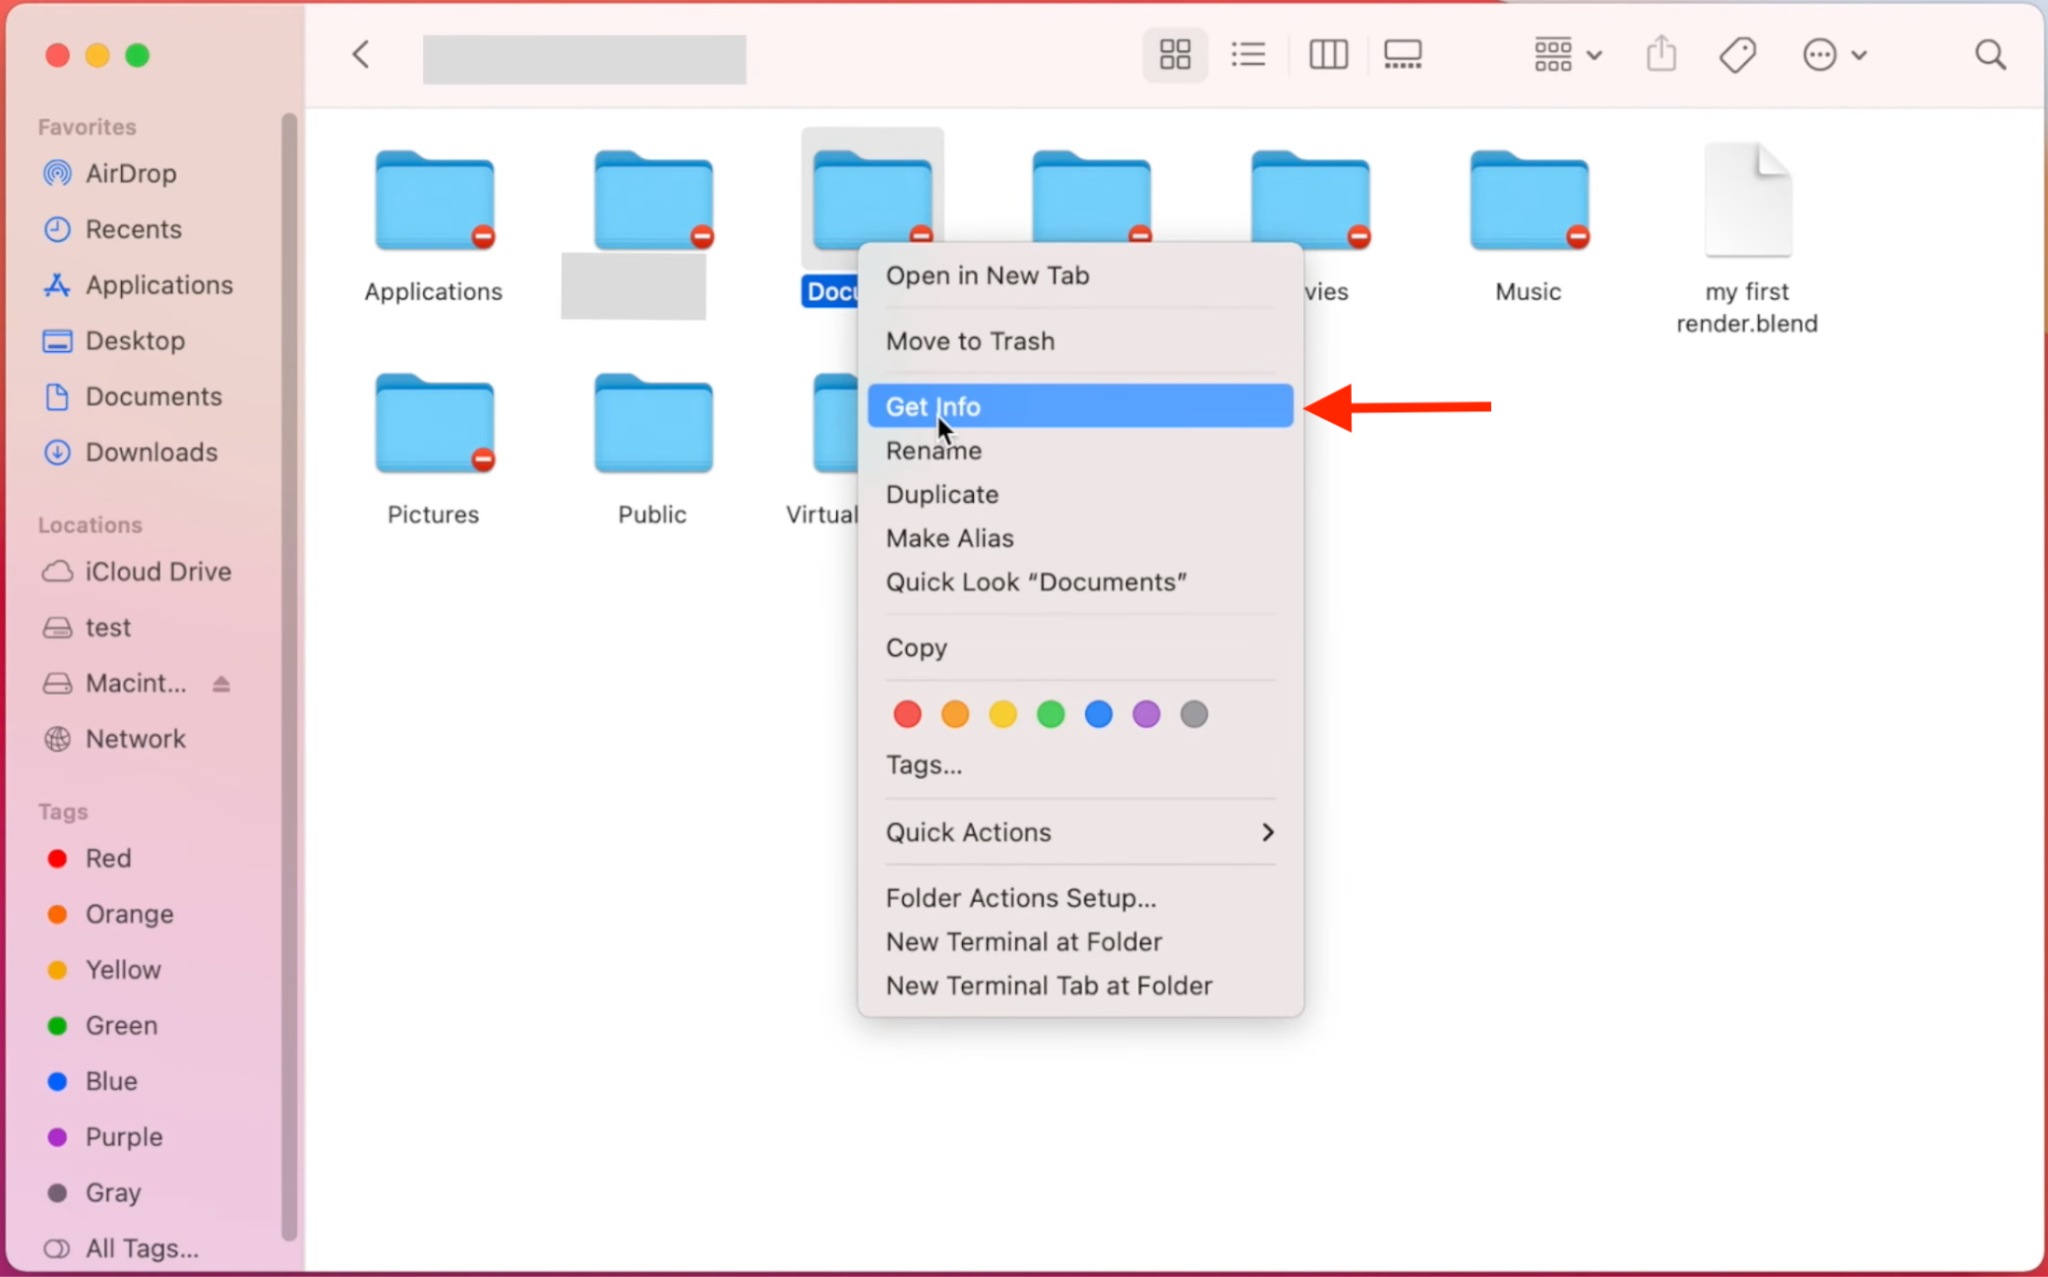
- To move forward from here you need to adjust those permissions. To do this, right-click on the desired folder and select the Get Info option.
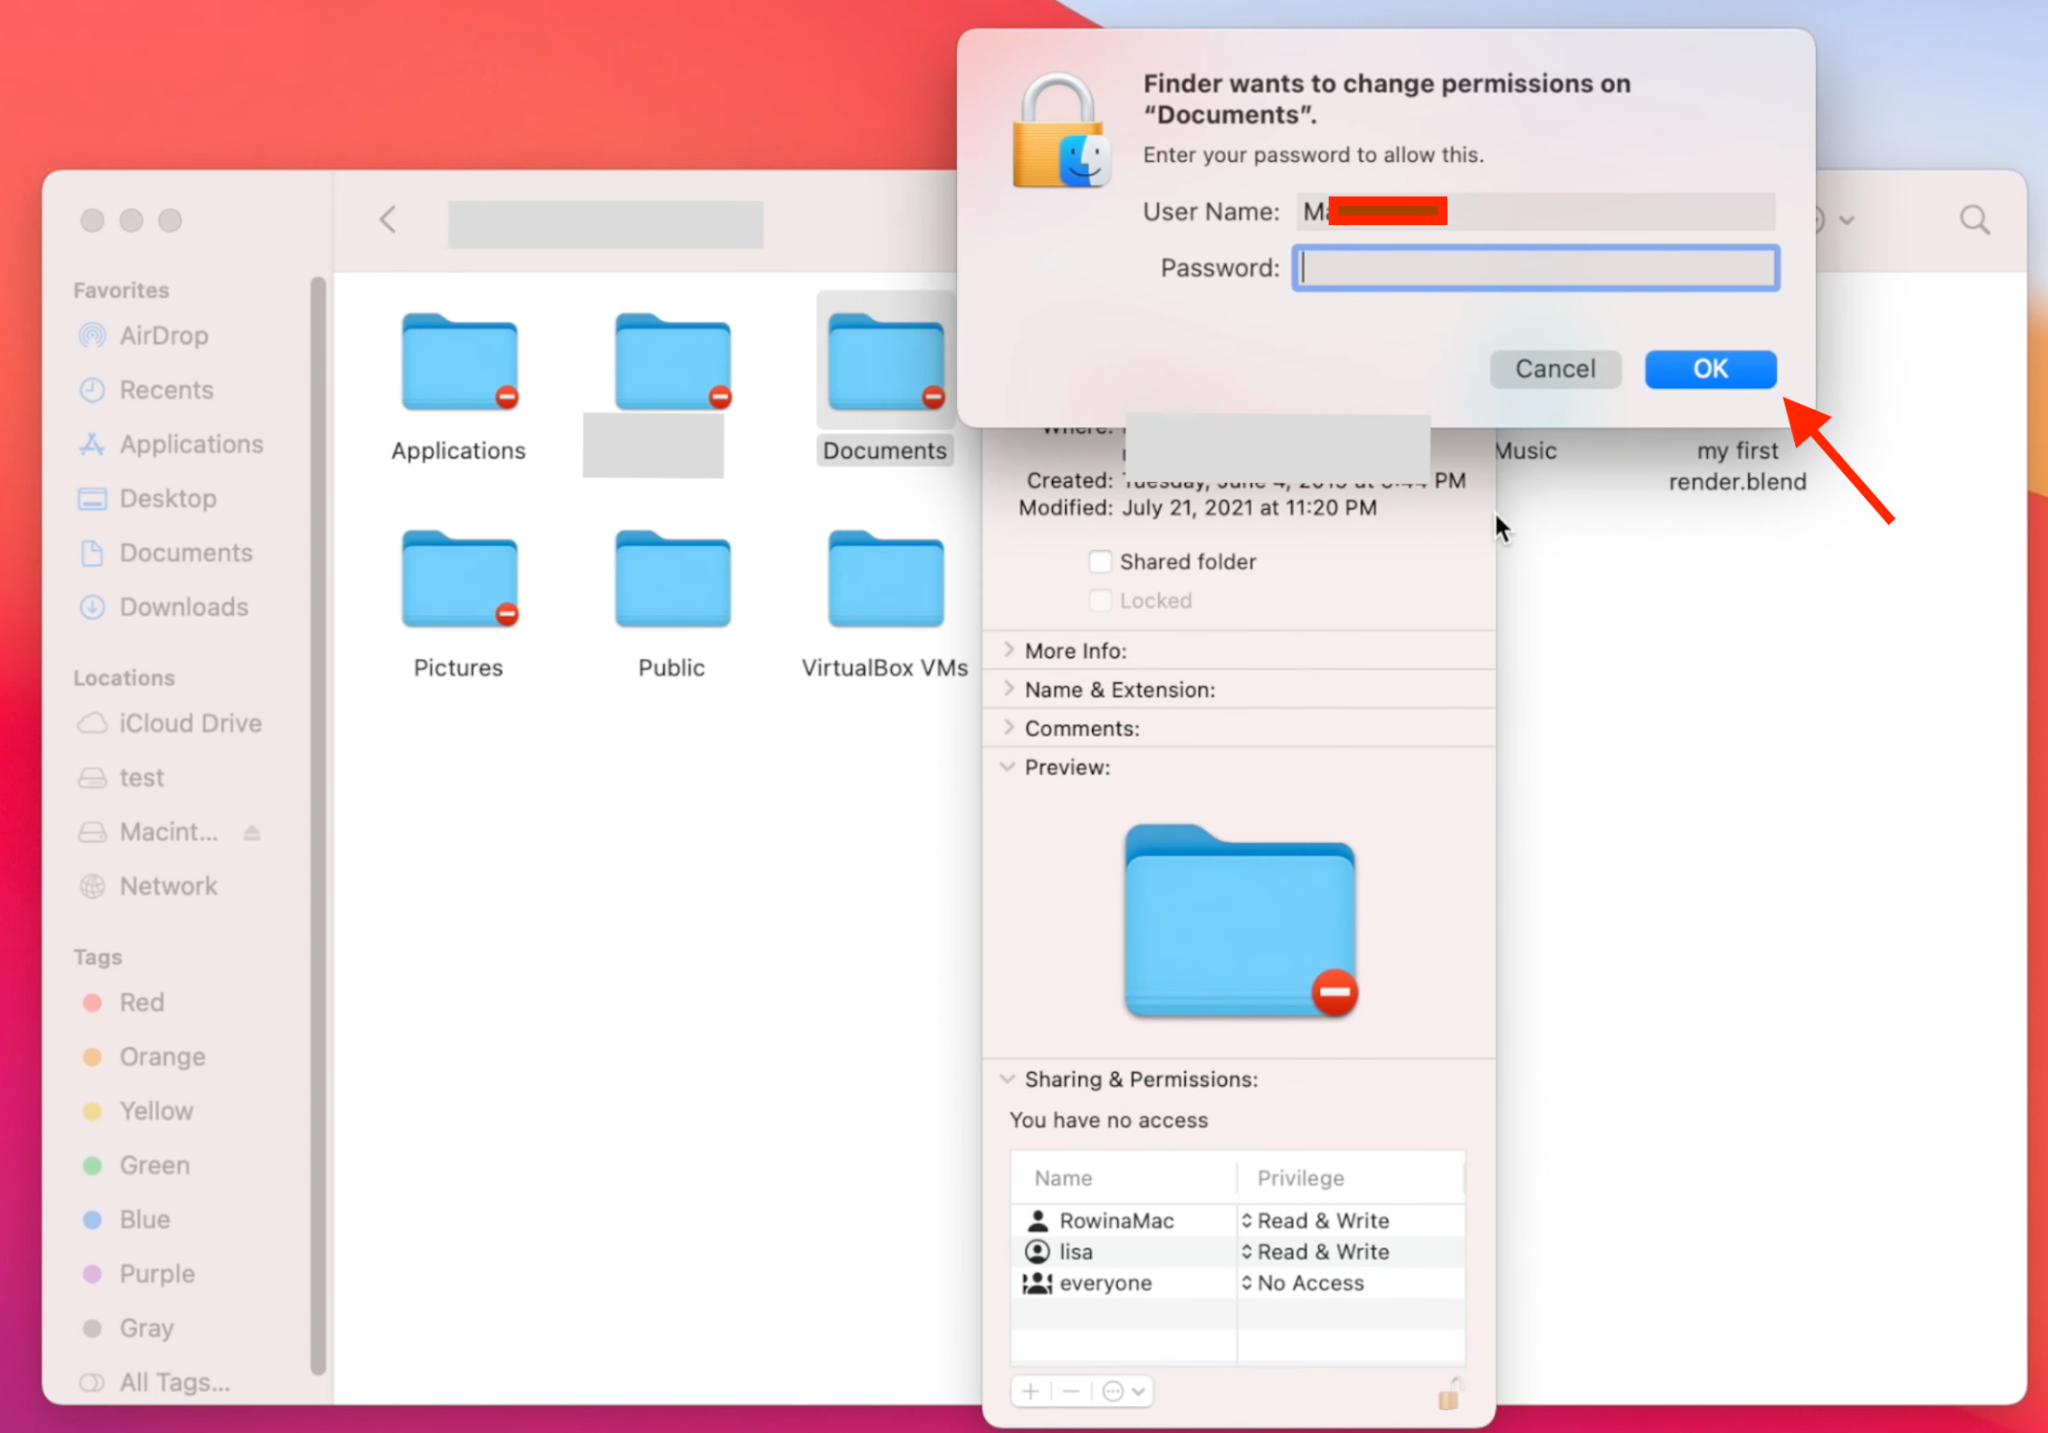
- Here on this screen, go to the bottom-right corner of the pop-up and click on the lock icon.
- Now put the password of that affected Mac of yours here and click OK
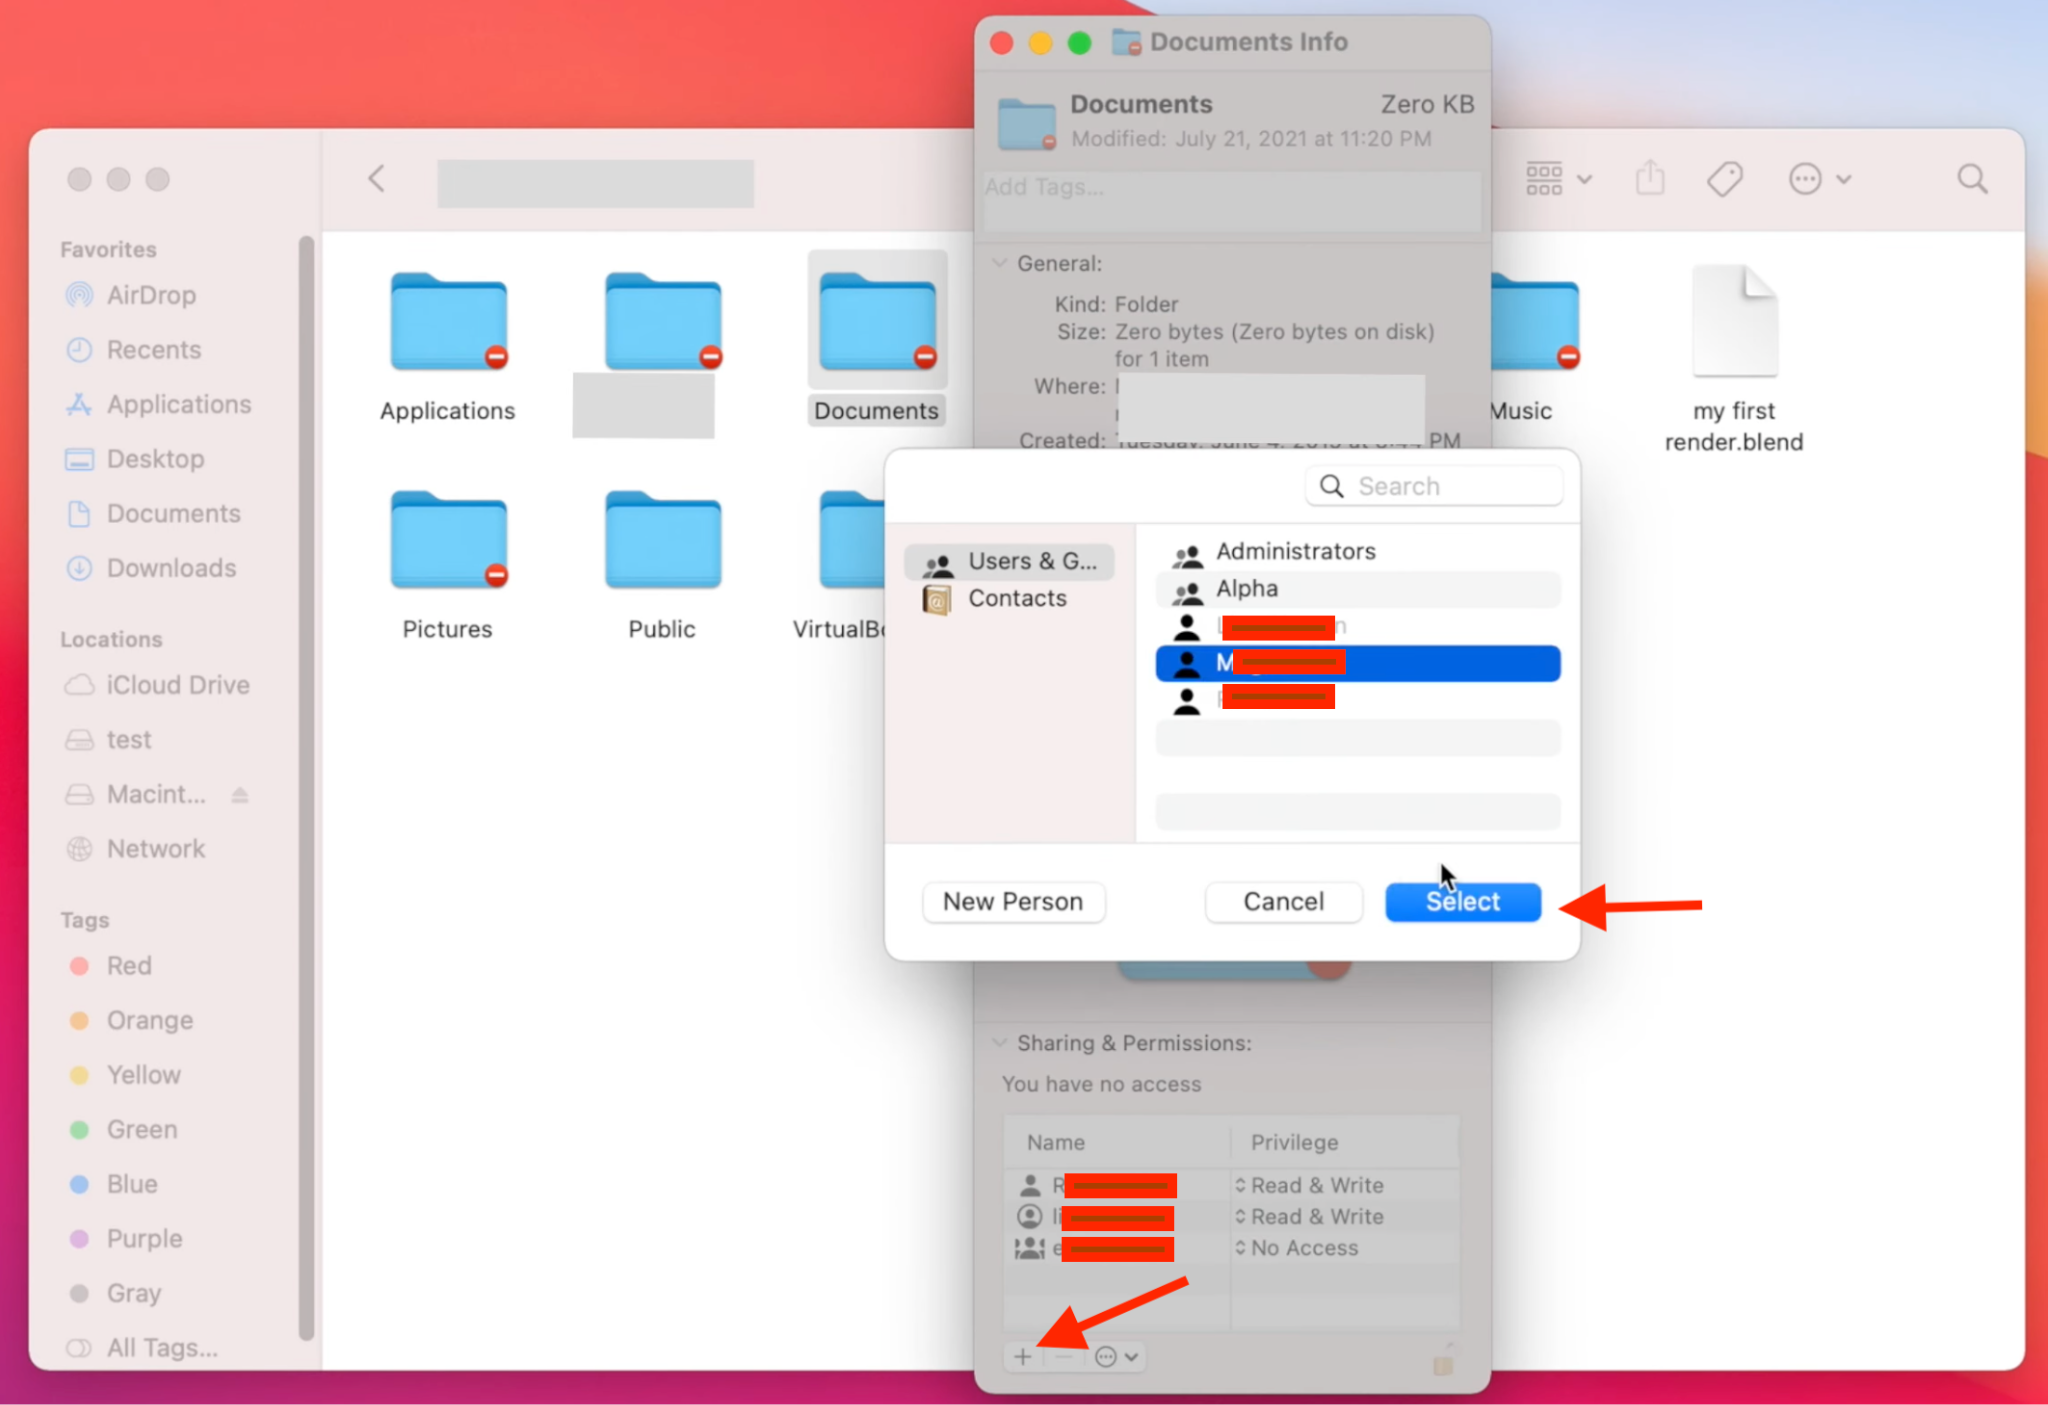
- Now choose the newly added account and click Select.
- Go ahead and change those permissions for the account to “Read & Write” and close the window. The folder will not be accessible to you. If there are multiple folders that have your lost files in them, you repeat this process again for that folder.
- Once you are done with those permissions and you can go in and out of those folders without a roadblock, just be simple and drag and drop the needed files/folders from the external disk to the host Mac or to another backup drive, whatever works for you..
- When you’re done with this, don’t just pull out the cable but eject the disk first…and then go ahead to restart both Macs normally.
- Restart the Mac and hold Command (⌘) + Simmediately to enter Single-User Mode. You’ll see a black screen with white text (a root shell).
- First, check the filesystem by typing fsck -fy and press Enter. Allow it to complete. If it fixes something, rerun fsck -fyuntil it reports “The volume (name) appears to be OK.”
- Next, mount the drive for read/write access by typing mount -uw / and pressing Enter.
- When done, type exit or reboot to leave Single-User Mode.
- Internet Recovery: Many a times that Internet Recovery is stuck in Mac. Restart and hold Option (⌥) + Command (⌘) + R. This boots your Mac over the internet into Recovery if the local system is damaged. Then you can use Disk Utility or Time Machine from there.
- Safe Mode: Restart and hold Shift. This boots macOS in Safe Mode (minimal drivers), which can sometimes mount your drive where normal boot can’t. Once in Safe Mode, try copying files out or running Disk Utility.
- Verbose Mode: Restart and hold Command (⌘) + V. This shows log output during boot, which can help diagnose issues. It doesn’t directly recover files, but if you see an error preventing boot, you might find a workaround (e.g. mount, cp).
- Do not write to the affected drive. Immediately stop using the Mac if possible, to avoid overwriting lost data
- For accidental deletion, run the software on the volume where files were lost.
- For a failing disk, you might remove the drive and connect it externally to another Mac to run the recovery there. Alternatively, create a disk image first (if possible) and recover from the image.
- Do not open the drive yourself or continue attempts, which could worsen damage.
- Research reputable data recovery firms (check reviews) and contact them.
- If advised, power off the drive and send it to the lab (or bring it to a local service).
- The lab will diagnose and quote you a cost. They will open the drive under clean conditions, attempt repairs, and then recover data onto another disk
Physical Data Loss Scenarios
Given these risks, it’s wise to backup regularly. But if data is already lost, don’t panic! You can try built-in Mac recovery tools and explore other options as well. Let’s go and cover those methods.
Data Recovery Methods for Mac
Below are several important methods and tools you can use to recover lost data on a Mac. Each is explained with a brief intro, step-by-step instructions, and a concluding note. Try them in order… starting with the simplest until you successfully get your files back.
Method 1. Restore from a Time Machine Backup
Time Machine is Apple’s built-in backup solution. If you had a Time Machine backup drive or a network Time Capsule, you can fully restore your system or individual files. This is the safest way to recover lost data, but it only works if you set up backups before the data was lost.
To check whether you had set up backups or not:
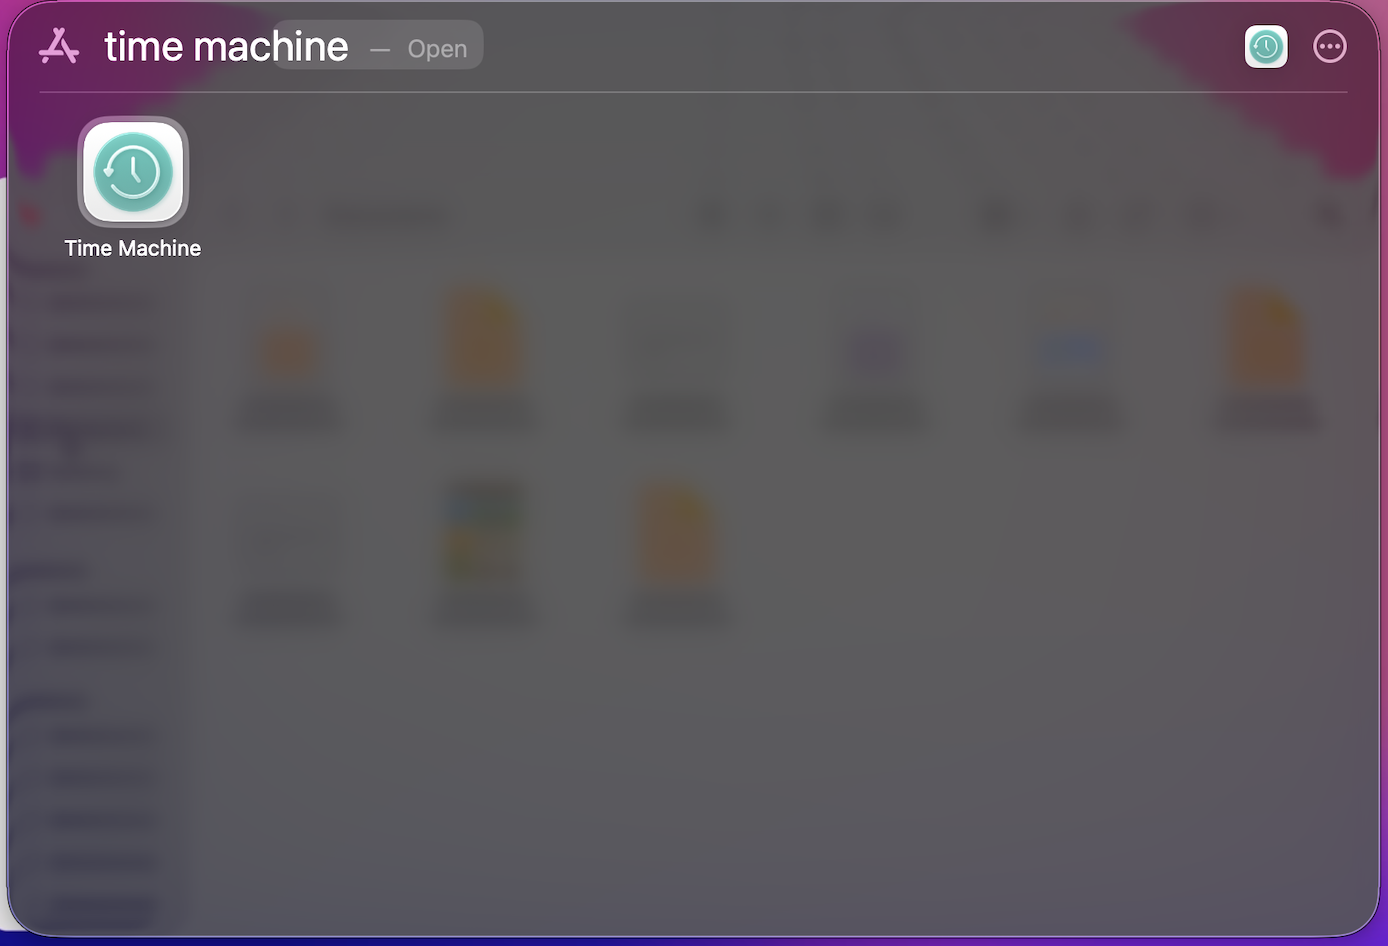
On the other hand, if a backup (in a Finder-like window) gets opened as soon as you choose the Time Machine icon, you can restore your data through these easy to follow steps:
If you want to restore your Mac to a previous backup, the steps are:
Restoring from Time Machine returns your Mac to the exact state it was in at the time of backup, including system files and user documents. If your data loss was accidental deletion or a recent drive issue, this can completely solve it. But if you can’t find a Time Machine backup or get a pop-up saying , “No Time Machine Backup found”, move to the next one.
Method 2. Retrieve Files from iCloud or Other Cloud Backup
If you use iCloud Drive, iCloud Photos, or other cloud storage (Dropbox, Google Drive, etc.), lost files may still exist in the cloud. You can often recover files by downloading them again. This isn’t a general-purpose solution for everything, but it works great for documents and media you have synced.
steps:
This method can directly restore any file you deliberately stored in the cloud or it got automatically synced. It will not recover files that were only on your local drive. But it’s very quick if your data loss was simply due to deletion without cloud sync.
Method 3. Run Disk Utility First Aid
In a scenario, where some data in your volume has been corrupted or become inaccessible, Disk Utility has a feature called First Aid which can repair that affected disk of yours and file system errors that caused data to become unreadable. Here goes the stepper:

If Disk Utility’s First Aid repair process has failed or the disk won’t mount… go ahead and try running First Aid on the parent drive or in Single-User Mode (check out the next method). If it still fails, do not reformat the drive or partition, because that would wipe data. Instead , move on to a recovery tool. First Aid can fix simple file system issues. Often, after a crash or power loss, the disk is “dirty” and needs repair. If successful, your data should reappear intact.
Method 4. Use Target Disk Mode (Disk Mode)
Since we’re exploring all kinds of scenarios, it might be that your Mac is not booting normally but the hardware is intact and so your files are not accessible. Here, you can connect it to another Mac and recover Mac storage drive data via Target Disk Mode. In this mode, your Mac acts like an external drive and easily lets you copy files off it. This is very helpful for rescuing data from a Mac with a bad OS installation or minor drive issues, but before going ahead, just try to force restart a frozen Mac and see if that works.
Note: You will need a spare Mac to perform this method.

Target Disk Mode bypasses the OS of the troubled Mac, letting you recover data directly. It’s as if plugging in an external hard drive. This method recovers all accessible files on the disk, as long as the drive is still functional enough to mount. It’s one of the most powerful built-in recovery tricks for Mac notebooks and desktops.
Method 5. Use Single-User Mode and fsck (For M1 Macs and Older)
If you are stuck in such a situation that your Mac is not booting and you have lost access to that valuable data of yours, this method will definitely come handy for you. It is an advanced technical method though. Mac can boot into Single-User Mode (similar to a recovery shell) and run the fsck tool to fix filesystem issues. You can try and copy those files and folders via Terminal while in this mode manually.
Note: This method doesn’t directly recover your files but repairs directory structure errors, fixes filesystem metadata issues (catalog B-tree, extents, allocation files etc.) and helps your volume become mountable again so that you can boot the system and copy your files.
If you still need files, connect an external drive or enable networking (advanced). You can copy files using cp or tools like ditto. For example: cp /Users/yourname/Documents/important.pdf /Volumes/BackupDrive/
Running fsck here is similar to Disk Utility’s First Aid, but can sometimes fix issues it cannot. The manual copy approach can salvage files even from a failing system. But be careful: a wrong command can cause more damage. Use this as a last resort if other steps have not worked.
Method 6. Use Recovery Key Combinations or Internet Recovery
If the above methods fail or your Mac won’t boot into Recovery, you can try some special boot modes:
Each of these is a way to get around a corrupted system. They don’t guarantee recovery, but may allow you to access the drive. For example, Internet Recovery lets you install a fresh macOS or run First Aid even if your Recovery partition is gone.
Method 7. Try a Professional Mac Data Recovery Software
When built-in tools aren’t enough, professional data recovery software can scan the drive’s raw sectors and rebuild lost files. These tools are often much better at finding deleted or corrupted data than Disk Utility. There are free utilities, but paid tools like Stellar Data Recovery for Mac are specifically designed for Macs (Our best pick in the next section.)
Before you go ahead, always remember these points:
A professional recovery program can often retrieve files when nothing else works. These tools can handle formatted drives, corrupt volumes, lost partitions, etc. A well-known example is Stellar Data Recovery for Mac. According to tests, even if only ~28% of users try DIY recovery software, those who do often succeed. Actually, about 79% success rate among trial users.
Method 8.Professional Data Recovery Services
If all DIY methods fail, or if your drive has severe physical damage, a professional data recovery lab like Stellar Data Recovery Lab-Services is the last resort. They have Class 100 clean rooms and specialized equipment to repair hard drives or salvage data from smashed media. It’s expensive, but can sometimes recover data that software cannot.
steps:
Recovery services can often get data off drives that are toasted for example a failed SSD controller or scratched HDD platters. However, success is not guaranteed and costs can be high (often hundreds to thousands of dollars). Use this when your data is extremely critical (like business records or irreplaceable memories) and all software fixes have failed.
Our Best Pick for Mac Data Recovery
If built-in fixes and simple backups aren’t enough, Stellar Data Recovery for Mac, a comprehensive mac data recovery software suite, is designed to handle it. It comes in multiple editions, from Standard up to Technician/Toolkit, to match different needs. All versions can deep-scan Mac drives (HDD, SSD, Fusion Drives, USB, etc.) to find deleted or lost files. You can recover documents, photos, videos, emails… virtually any file type from your Mac’s internal drive or external media.
Using Stellar Data Recovery for Mac step-by-step:
- 1. Download and install Stellar Data Recovery for Mac.
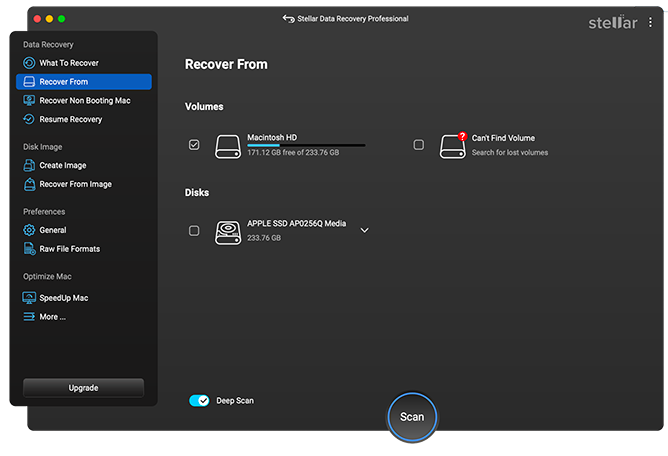
- 2. Launch the software and on the main screen, choose the type of data to recover (documents, photos, videos, or select Everything). Click Next.
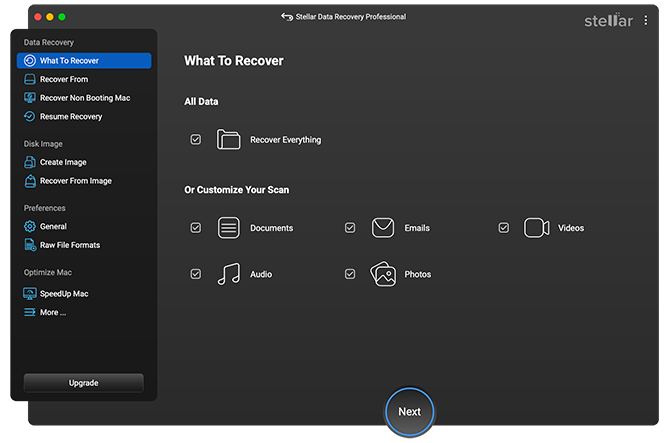
- 3.Select the drive/volume to scan (e.g. “Macintosh HD” or an external disk). Click Scan and don’t forget to turn on the Deep Scan switcher.
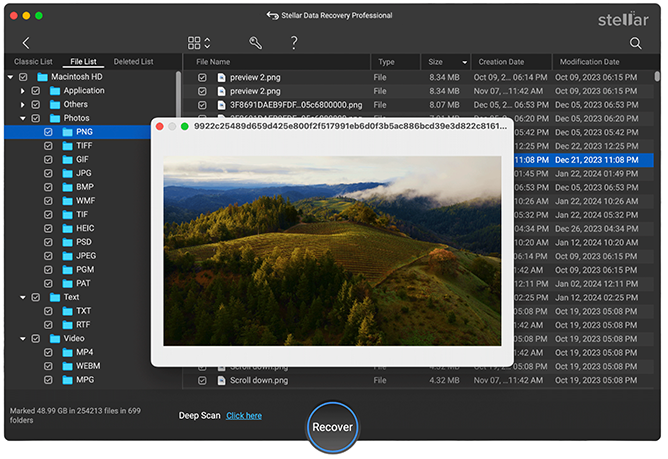
- 4.Wait for the scan to finish. You’ll see a list of recoverable files. You can preview items to confirm they are intact.
- 5.Select the files/folders you want to recover and click Recover. Choose a safe destination (another drive) to save the recovered data.
- 6.After recovery completes, verify that your lost files are back in the destination.
Stellar Data Recovery for Mac is a robust software solution that often succeeds where built-in tools fail. It is highly recommended when you need a user-friendly yet powerful recovery option. Whether you choose Standard, Professional, or Technician, the core engine is the same… it simply has more features the higher you go. In our experience, using Stellar Data Recovery for Mac is often the fastest way to get most or all of your lost data back without paying for a full-on lab service.
| Situation / Symptom | Likely Cause | Likely Cause What to Try First | If That Fails | Last Resort |
| Files deleted normally | Human error | Check Trash | Restore via Time Machine > Check iCloud/Cloud backups | Use Data Recovery Software |
| Files deleted + Trash emptied | Permanent deletion | Check iCloud Drive > Recently Deleted | Try Time Machine snapshots | Data Recovery Software |
| Drive/volume accidentally formatted | Human error | Stop using the drive immediately | Scan device using Data Recovery Software | Professional Lab Recovery |
| Mac not booting / Frozen at startup | OS crash / File system corruption | Try Recovery Mode > Run Disk Utility First Aid | Use Target Disk Mode to copy files | Boot via Internet Recovery → Use Data Recovery Software |
| Mac shows flashing folder, -2003F, or won’t mount disk | APFS/HFS+ corruption | APFS/HFS+ corruption Disk Utility First Aid | fsck in Single-User Mode | Use Data Recovery Software > Lab |
| Pink/Black/White Screen of Death | macOS crash or failed update | Boot in Safe Mode | Run Recovery Mode + First Aid | Use Data Recovery Software > Lab |
| External drive not mounting | File system corruption | Run First Aid on the external disk | Recover with Stellar Data Recovery for Mac (Deep Scan) | Lab Recovery |
| SSD slowing, overheating, or failing | SSD controller or NAND issue | Create a Disk Image immediately | Run Stellar Data Recovery for Mac on the Disk Image | Lab Recovery (controller failure = lab-only) |
| HDD clicking or making noise | Mechanical failure | Power off immediately | Skip software (risk of damage) | Lab Recovery Only |
| Water-damaged Mac / liquid spill | Physical damage | Power off, don’t dry with heat | Remove SSD if possible → Recover externally | Lab Recovery |
| Cloud files missing (iCloud/Dropbox/GDrive) | Sync conflict / accidental cloud deletion | Check Recently Deleted folder in cloud | Restore via iCloud Data Recovery | Check local Time Machine / Data Recovery Software |
| Time Machine backup missing / corrupt | Backup failure | Reconnect drive → Try backup repair | Mount sparsebundle in Disk Utility | Try Data Recovery Software |
| Encrypted drive (FileVault enabled) | Lost password / key | Must entercorrect password or recovery key | Without key → recovery impossible | Lab Services |
| Disk Utility First Aid failed | Severe corruption | Try First Aid on parent container | Use fsck or Safe Mode | Try Data Recovery Software |
| Encrypted drive (FileVault enabled) | Lost password / key | Must enter correct password or recovery key | Without key → recovery impossible | Lab Services |
Smarter Ways to Safeguard Your Mac Data
To avoid finding yourself in an emergency again, adopt a multi-layer backup strategy: use Time Machine and a cloud backup if possible. If you have another Mac lying around, then you can also backup an external drive on Mac.
Furthermore, take advantage of APFS snapshots as extra safety nets. Every time you update macOS, it automatically creates a snapshot of the system that you can later restore in Recovery Mode, provided you are using Time Machine
Meanwhile, SSD adoption continues to rise; SSDs are more shock-resistant than HDDs, but they also require advanced tools to recover after failure. Stellar’s deep-scan algorithms are already SSD-aware, and the “drive cloning” feature is particularly useful for getting data off an SSD before it dies, as long as the SSD controller is not failing.
Conclusion
The best way to go forward is prevention. Just Backup, backup, backup. Regularly verify those backups (Time Machine alerts can help) and always keep a clone or two of those critical drives. But if any accidents happen and they will, you now have a comprehensive set of remedies right here. From built-in Apple utilities to professional labs, Mac data recovery is quite possible in most of those cases. And with Stellar Data Recovery’s powerful software stacked in your toolkit, you’ll maximize those chances of retrieving lost memories, documents or projects. Just stay safe, back up often and basically don’t hesitate to try these solutions if any disaster strikes!
About The Author
Pallavi is a literature graduate turned content strategist, specializing in data recovery. She creates insightful, user-friendly content to help people rescue their data from hard drives, SSDs, memory cards, and more. When she’s not decoding tech for everyday users, she’s curled up with a book or secretly planning her next adventure.
WHY STELLAR® IS GLOBAL LEADER
-
0M+
Customers
-
0+
Years of Excellence
-
0+
R&D Engineers
-
0+
Countries
-
0+
PARTNERS
-
0+
Awards Received


